

Geospatial Training Services offers hands-on courses in AI-assisted Python automation for ArcGIS Pro. Visit geospatialtraining.com to learn more about our upcoming bootcamps and live-online classes.
For years, the barrier to automating GIS workflows has been the same: you had to learn Python, then learn ArcPy’s extensive library, then debug cryptic error messages—all before you could automate a single task. Many GIS professionals never made it past the first hurdle.
AI assistants like ChatGPT, Claude, and Gemini have fundamentally changed this equation. Now you can describe what you want in plain English, get working code, and iterate quickly when something doesn’t work. Your expertise in GIS workflows becomes the valuable skill—you know what needs to happen, and the AI handles the syntax.
But here’s the reality that the hype often misses: AI-generated code doesn’t always work on the first try. The real skill isn’t just prompting—it’s knowing how to iterate between code generation and execution until you get working results.
In this article, I’ll walk through a realistic workflow using a file geodatabase with feature classes typical of municipal GIS operations. You’ll see exactly how the conversation between you and an AI assistant unfolds, including the errors that occur and how to recover from them.
What Are AI Chatbots and How Do They Work?
If you haven’t used AI chatbots before, here’s what you need to know. These tools are Large Language Models (LLMs)—software trained on vast amounts of text, including programming documentation, code repositories, and technical tutorials. You interact with them through a simple chat interface: you type a message, and they respond with text, code, or explanations.
Think of them as extremely knowledgeable assistants who have read the entire ArcPy documentation, thousands of Python tutorials, and millions of code examples. They don’t “run” code themselves—they generate code for you to copy and execute in ArcGIS Pro.
The Major AI Assistants for Code Generation
ChatGPT (OpenAI)
- Website: chat.openai.com
- Free tier available (GPT-4o with usage limits)
- Paid tier: $20/month for ChatGPT Plus
- Strengths: Widely used, excellent code generation, strong general knowledge
- Best for: Most users; it’s the most popular option with the largest user community
Claude (Anthropic)
- Website: claude.ai
- Free tier available (Claude Sonnet)
- Paid tier: $20/month for Claude Pro
- Strengths: Excellent at following complex instructions, detailed explanations, handles longer conversations well
- Best for: Complex multi-step workflows, when you need thorough explanations of code
Gemini (Google)
- Website: gemini.google.com
- Free tier available
- Paid tier: $20/month for Gemini Advanced
- Strengths: Integration with Google services, strong reasoning capabilities
- Best for: Users already in the Google ecosystem
Getting Started
To use any of these tools:
- Visit the website and create a free account
- You’ll see a chat interface—just a text box where you type your request
- Type your prompt (your request for code) and press Enter
- The AI responds with code and explanations
- Copy the code and paste it into ArcGIS Pro’s Python window
The free tiers are sufficient for learning and occasional use. If you find yourself using these tools daily for work, the paid tiers offer faster responses, higher usage limits, and access to more capable models.
Which One Should You Choose?
For ArcPy code generation, all three produce excellent results. My recommendation:
- New to AI chatbots? Start with ChatGPT—it has the most tutorials and community resources available
- Need detailed explanations? Try Claude—it excels at walking through code step by step
- Already use Google Workspace? Gemini integrates well with your existing tools
The prompting techniques in this article work with all three platforms. Try one, and if you’re not satisfied with the results, the same prompt will work in another.
The Scenario: Inventorying a City Geodatabase
Let’s say you’ve inherited a geodatabase from a colleague and need to understand what’s in it before starting a project. You could click through each feature class in ArcGIS Pro’s Catalog pane, but with a dozen or more feature classes, that gets tedious fast.
This is a perfect automation candidate: repetitive, straightforward, and low-risk if something goes wrong.
Step 1: Writing Your First Prompt
The key to effective prompts is specificity. Don’t just ask for “a script to list feature classes”—give context about your environment and what output you want.
Here’s an effective prompt:
Write an ArcGIS Pro Python/ArcPy script that sets the workspace to a file geodatabase, lists all feature classes in the geodatabase, and prints the name, geometry type, and record count for each feature class. Include comments explaining each section.
Notice the structure: Context (ArcGIS Pro, ArcPy) → Task (list feature classes) → Details (name, geometry type, record count) → Format (include comments).
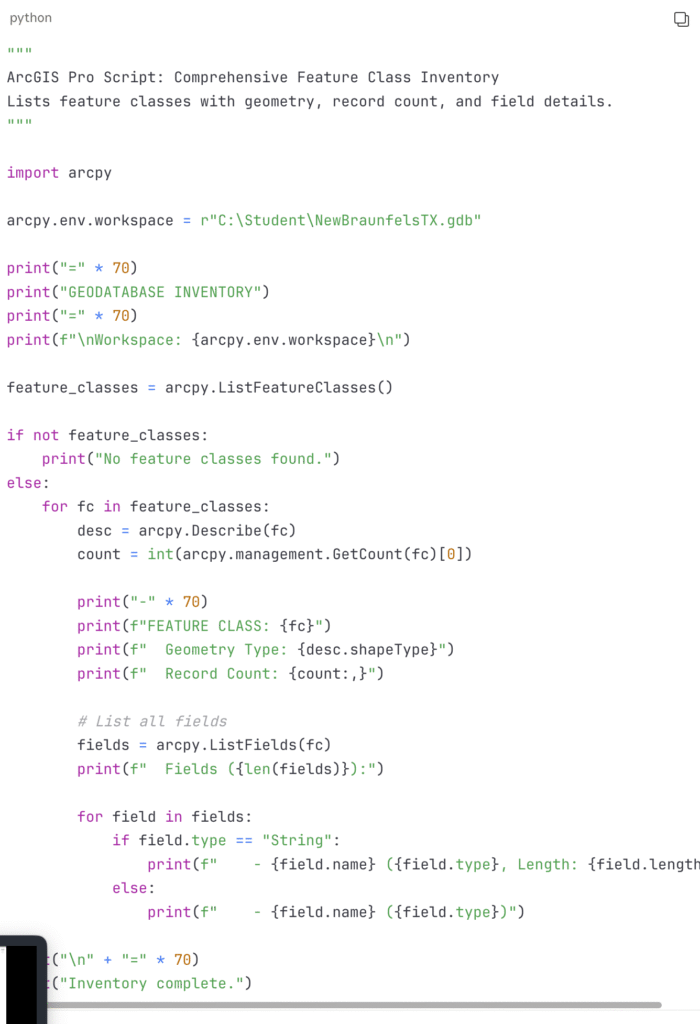
The AI responds with something like this:

Step 2: Running the Code and Encountering the First Error
You copy this code into the ArcGIS Pro Python window, update the path to your geodatabase, and run it. The output looks promising:

Success! The script works. But now you want more information—specifically, you want to see the field names for each feature class.
Step 3: Iterating with a Follow-Up Prompt
You go back to the AI and ask:
That works great. Can you modify this script to also list all the field names and their data types for each feature class?
The AI updates the code:
Step 4: When Things Go Wrong—A Real Error Scenario
Now let’s say you want to get more ambitious. You ask the AI:
Create a script that calculates the ratio of improvement value to land value for each parcel in the City_Parcels feature class, adds this as a new field called “IMPROVE_RATIO”, and then lists the top 10 parcels with the highest ratios.
The AI generates code that includes lines like this:

But when you run it:

What happened? The AI assumed a field name that doesn’t exist in your data. It guessed “Improvement_Value” but your geodatabase actually uses “Improvemen” (truncated from a shapefile conversion) or perhaps “Improv_Val”. This is extremely common—AI assistants don’t know your specific data schema and make reasonable guesses based on common naming conventions.
Step 5: The Recovery Conversation
Here’s where your GIS expertise matters. You copy the error message and paste it back to the AI:
I get this error when running the script: RuntimeError: Cannot find field ‘Improvement_Value’
The AI responds:
The script is looking for a field that doesn’t exist in your feature class. Let me provide a diagnostic script to check which fields are actually available, so we can use the correct field name.
It then provides a diagnostic script:

You run this and see the output:

Now you see the problem—the field is actually called “Improvemen” (truncated to 10 characters, likely from an old shapefile). You tell the AI:
The field is actually called “Improvemen” not “Improvement_Value”. Please update the script.
The AI regenerates the code with the correct field name, and now it runs successfully.
Step 6: Building a Complete Workflow
After several iterations, you’ve built confidence. Now you tackle something more complex—a script that:
- Buffers railroad lines by 500 feet
- Clips parks to that buffer
- Calculates affected park acreage
Your prompt:
Create an ArcPy script that buffers the Railroads feature class by 500 feet, clips the Parks feature class to that buffer, adds an “AFFECTED_ACRES” field to the output, and calculates the acreage. Save the output to a new feature class called “Parks_Near_Railroad”.
The AI generates a multi-step workflow:

Notice the try/except block—this is error handling that the AI often includes, which helps you understand what went wrong when scripts fail.
Best Practices for AI-Assisted ArcPy Development
After working through dozens of scripts with AI assistance, here are the patterns that work:
1. Start Simple, Build Up Don’t ask for a 200-line script on your first prompt. Start with the core functionality, verify it works, then add features iteratively.
2. Provide Your Data Context If you have a geodatabase schema, share it with the AI. Run an inventory script first and paste the results into your conversation. The AI can then use correct field names and feature class names.
3. Paste Full Error Messages When something breaks, copy the entire error message—not just the last line. Include the traceback if there is one. This gives the AI the context it needs to diagnose the problem.
4. Validate Outputs Always check that the results make sense. If a script says it processed 1,000 features but you expected 100, something is wrong. Your GIS expertise is the validation layer that AI cannot replace.
5. Use the Python Window for Testing The ArcGIS Pro Python window is perfect for quick tests. Once you have working code, you can move it to a standalone script or convert it to a Script Tool.
The Iterative Mindset
The biggest shift in AI-assisted coding is accepting that iteration is normal. The workflow looks like this:
- Prompt → Describe what you want
- Generate → AI produces code
- Run → Execute in ArcGIS Pro
- Error? → Paste error back to AI, get fix
- Works? → Add the next feature
- Repeat → Until the workflow is complete
This loop might go around three or four times for a simple script, or a dozen times for something complex. That’s not failure—that’s the process.
Conclusion
AI assistants don’t eliminate the need to understand GIS concepts. They do eliminate the need to memorize syntax. For GIS professionals who know what they want to accomplish but have been blocked by how to code it, that’s a genuine breakthrough.
The key skills aren’t going away—understanding coordinate systems, knowing when to buffer versus clip versus intersect, validating that outputs make sense. What changes is that you can now express those skills in code without years of Python study.
Start small. Build your first inventory script. Debug your first error. Once you’ve completed that loop a few times, you’ll wonder how you ever worked without AI assistance.
