
The Near geoprocessing tool in ArcGIS Pro calculates distances between features in different layers. We’ll demonstrate how this tool works using a point and polygon layer. To calculate the distance between two features you could use the measure tool that is available under “Map” and the “Inquiry” tab on the ribbon interface in Pro. For two features this might work, but it’s better to use an automated approach when using layers with many features. Here, we’ll use the Near geoprocessing tool, which is found in the Proximity toolbox inside the Analysis toolbox. This tool calculates distance and additional proximity information between input features and the closest feature in another layer or feature class.
Using this tool, we’ll do two things:
- Analyze which parks and protected land points are within a distance of 100km of an urban area (inside the US)
- Calculate this distance in km for each matching input feature
The Near tool does both things at once by adding two columns in the input feature class attribute table. The first column specifies the Object ID of the target dataset that is nearest to it and returns -1 if there’s no match. No match means there is no urban area within 100km of that park or protected land point. The second column specifies the distance of the source feature to the target feature in kilometers. The workflow is pretty straightforward, but it’s important to reproject the data so that area is preserved.
STEP 1: Download the data
To complete this tutorial on how to calculate distances between features, we will need to first Download the Natural Earth Quick Start kit. Once downloaded, unzip it to a local folder. Open up Pro and create a new project. Add the following two shapefiles to the map window from the downloaded dataset:
* ne_50m_urban_areas
* ne_10m_parks_and_protected_lands_point
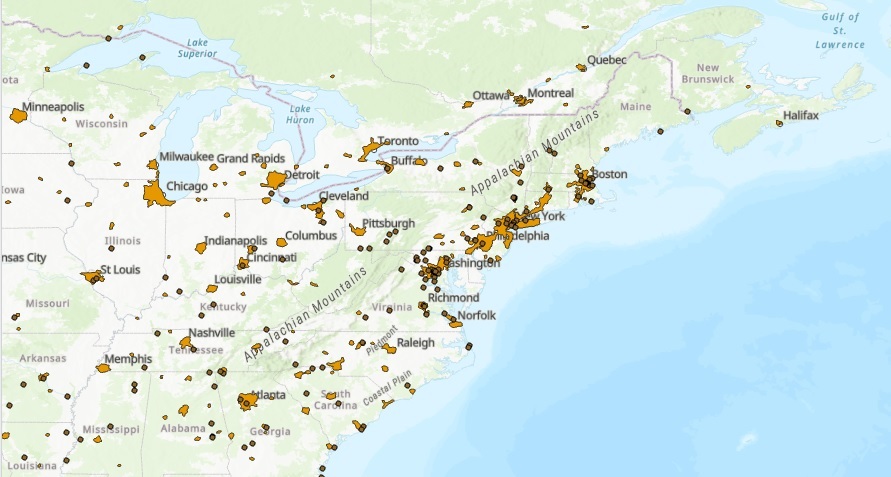
The urban areas are polygon features, while the parks and protected areas are point features. Make sure the point features are positioned on top of the polygon features so you can see them. In the image below, you can see that in the North East of the US, many parks (brown point features) are located near or within urban areas (orange polygons):
STEP 2: Reproject the data
For the most accurate distance results, reproject both data layers using a projection that preserves distance. For this project, I used the Albers equal-area conic projection as it covers North America. Search for the Project tool under Data Management Tools and open it. Specify the input feature class, name the output feature class and click the globe icon right to Output Coordinate System. Find Albers equal-area conic under Projected Coordinate System -> Continental -> North America -> North America Albers Equal Area Conic. Run the tool for each of the two data layers as you cannot project more than one feature class at a time. Make sure you uncheck the original data layers and have the two reprojected layers visible on the map. These are the output feature classes created with the Project tool.
STEP 3: Calculate distances between features
Search for the Near tool (under Data Management). We will now calculate the distances between the projected point and polygon data. Open the tool and use the following parameters:
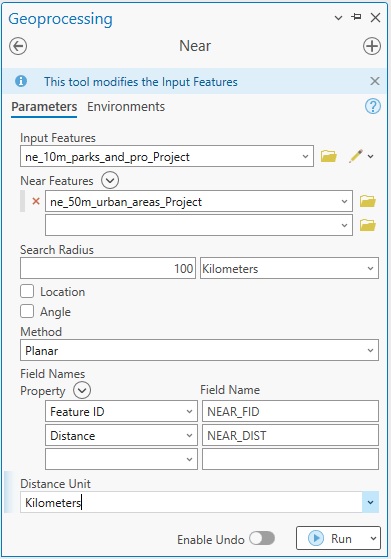
Run the tool and open the attribute table of the Input Feature layer (the projected point data). The distances between features are found in the NEAR_DIST column at the far right of the table. You can also see where a feature is by selecting a row in the table (the entire row is highlighted in green to show it is selected) and clicking the “Zoom To” button. For example, we see that the first feature (wit the unit name Great Basin NP) has a NEAR_FID value of -1, meaning there’s no match, meaning there’s no urban area within 100kms. The second row feature, with unit_name of Mesa Verde NP is almost 45km away from an urban area. If we zoom to the feature on the map, we can use the Measure tool to see that this is correct:

There’s one more value of interest in the NEAR_DIST column, which is 0 (zero). This value means it is contained within an urban area, hence the lack of a distance value.
We hope you have enjoyed this tutorial, learning how to calculate distances between features in ArcGIS Pro. You can view more tutorials and articles focusing on ArcGIS Pro topics at ArcGIS Pro Articles Archives – (geospatialtraining.com). To view live video tutorials on similar topics, visit our YouTube Channel at Geospatial Training Services – YouTube.
