In this tutorial, we will be using Python’s Calculate Field tool along with Python to manipulate existing attribute field values and create new ones.
When working with attribute data, you might want to change existing field values or create new ones. Pro offers the use of Python3 and Arcade functions for quick manipulation of field values through its Field Calculator tool. In this tutorial, we will give some examples of how to manipulate existing field values using both Pro’s helper functions and built-in Python functions.
We will use the attribute table of a hosted feature layer from ArcGIS Online called “London Boroughs”, that includes some useful example data. To be able to manipulate the data in Pro, we will have to add the hosted feature layer to ArcGIS Pro’s map interface and use the Copy Features geoprocessing tool to make a copy of the features first. Here is a small sample of the layer’s attribute table:

Example 1: Rounding the Area field values to two decimal values
In this example, we will use Python’s built-in round() function to round the “Area (km2)” column values to two decimals instead of three. To do this, we will right-click the column name (found right next to the HECTARES column) and choose “Calculate Field” to open the Field Calculator tool. Leave the Input Table field as it is as it is automatically updated when opening the tool. Instead of overwriting our existing column values, we will create a new field for our rounded area values, so choose a new field name under Field Name (Existing or New).
Because you are creating a new field, you will need to enter a Field Type. This will be “Double”, as we want two decimal values instead of three (the current value). For Expression Type, leave the input field as it is (it should be set to “Python 3”). Next, double-click the “Area (km2)” field, that will be added to the empty input field right below as “!AREA!”. This field is found below the input “Input Values” field and right above where it says “Code block”. Next, change the !AREA! expression to “round(!AREA!, 2)”, as displayed below:
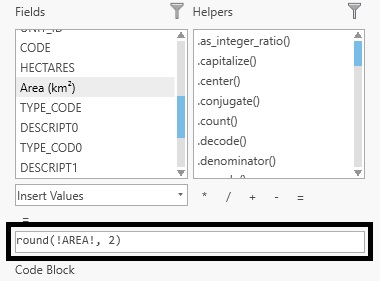
Next, click Verify underneath the empty code block. The expression should be valued as valid. Finally, click Apply and ignore the warning and find the newly populated column at the far right of the attribute table.
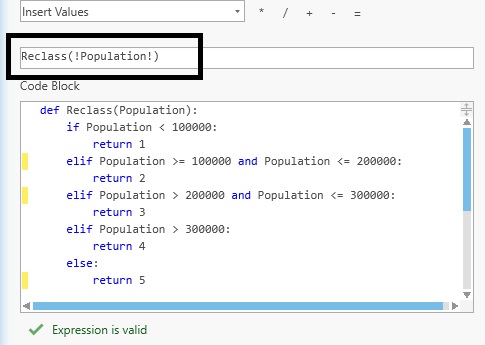
Example 2: reclassifying existing column values based on a condition using Python
We will know reclassify all population values into four numerical categories. The idea is to use a Python if-else statement so that all population values are automatically reclassified by Pro. We will use the following values: all values below 100,000 will be classified “1”, all values between 100,000 and 200,000 as “2”, all values between 200,000 and 300,000 as “3” and everything above 300,000 as “4”. Right click the Population column name in the Attribute Table and choose the Calculate Field tool. Under “Field Name (Existing or New)”, fill in a new field name, for example “Population Reclassify”. For Field Type, choose Short (small integer). Leave the Expression Type field as it is (Python 3) and double click the Reclassify helper function from the Helpers list. This automatically populates the Expression field with the following text: Reclass(!Field!). Change the input of this field as listed in the image below and edit the code field using the information listed above about the categories and population values. The entire code is listed in the image below. Click OK to run the tool and look for the new field in the attribute table on the far right.
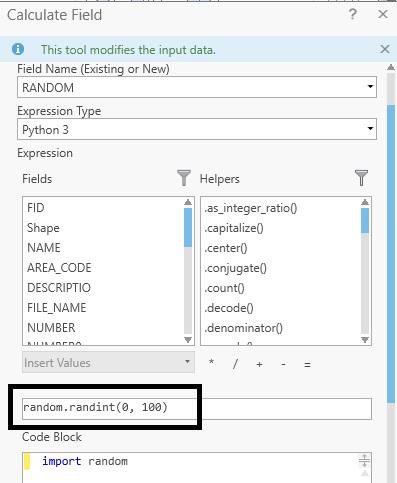
Example 3: Populating a new, empty field with random integer values
Python offers multiple libraries for generating random values. You can use these as an expression to populate a new, empty field in the Field Calculator. Because we are not using existing input data as we did in the examples above but are creating new values on-the-fly, it’s best to create a new, empty field that we will populate with random values created using Python. Creating a new field in the attribute table is done by clicking the “Add” button on the top-left of the attribute table. You can then choose a field name and associated data type. A short integer type will work fine here. To save the newly added field, right click the field name and choose “save”.
Next, locate the new field in the attribute table and open the Calculate Field tool. Make sure you have the new, empty field name selected under Field Name (Existing or New). In the expression field, add a Python code snippet for generating random values (see image below). In the Code Block field, import the random module. Click “OK” and the new field will be populated with random values. Instead of using the random module, you can also use the numpy.random.random() function for returning random numbers. This function returns values between 0.0 and 1.0.