Don’t forget that you can save 20% on our self-paced, live-online, and in-person GIS training through December 31st by using the discount code 20for20. Discount already applied to the Annual GIS Training License.
GIS is all about visualizing and analyzing spatial data to uncover patterns, relationships, and insights. One of the most intuitive and user-friendly tools in ArcGIS Pro for comparing spatial datasets is the Swipe Tool. This interactive feature allows users to reveal or conceal layers by “swiping” across the map, making it an essential utility for presentations, analysis, and data exploration.
In this article, we’ll dive into what the ArcGIS Pro Swipe Tool is, how to use it effectively, and some practical applications that demonstrate its value.
What Is the Swipe Tool in ArcGIS Pro?
The Swipe Tool in ArcGIS Pro is an interactive map visualization feature that lets you temporarily remove or expose layers on the map by sliding a bar horizontally, vertically, or in freeform directions. It is a great way to compare different datasets, highlight changes over time, or focus on specific map elements without permanently altering layer visibility.
This tool is especially useful when:
- Comparing before-and-after imagery (e.g., pre- and post-disaster satellite images).
- Examining differences between datasets, such as land cover changes or infrastructure development.
- Presenting interactive visualizations to stakeholders or team members.
How to Use the Swipe Tool
Using the Swipe Tool in ArcGIS Pro is straightforward. Follow these steps to get started:
1. Prepare Your Map:
- Open ArcGIS Pro and load the map with the layers you want to compare.
- Ensure the layers of interest are visible and ordered appropriately in the Contents pane.
2. Activate the Swipe Tool:
- You’ll need to have a layer selected in the Contents pane to display the Feature Layer context tab.
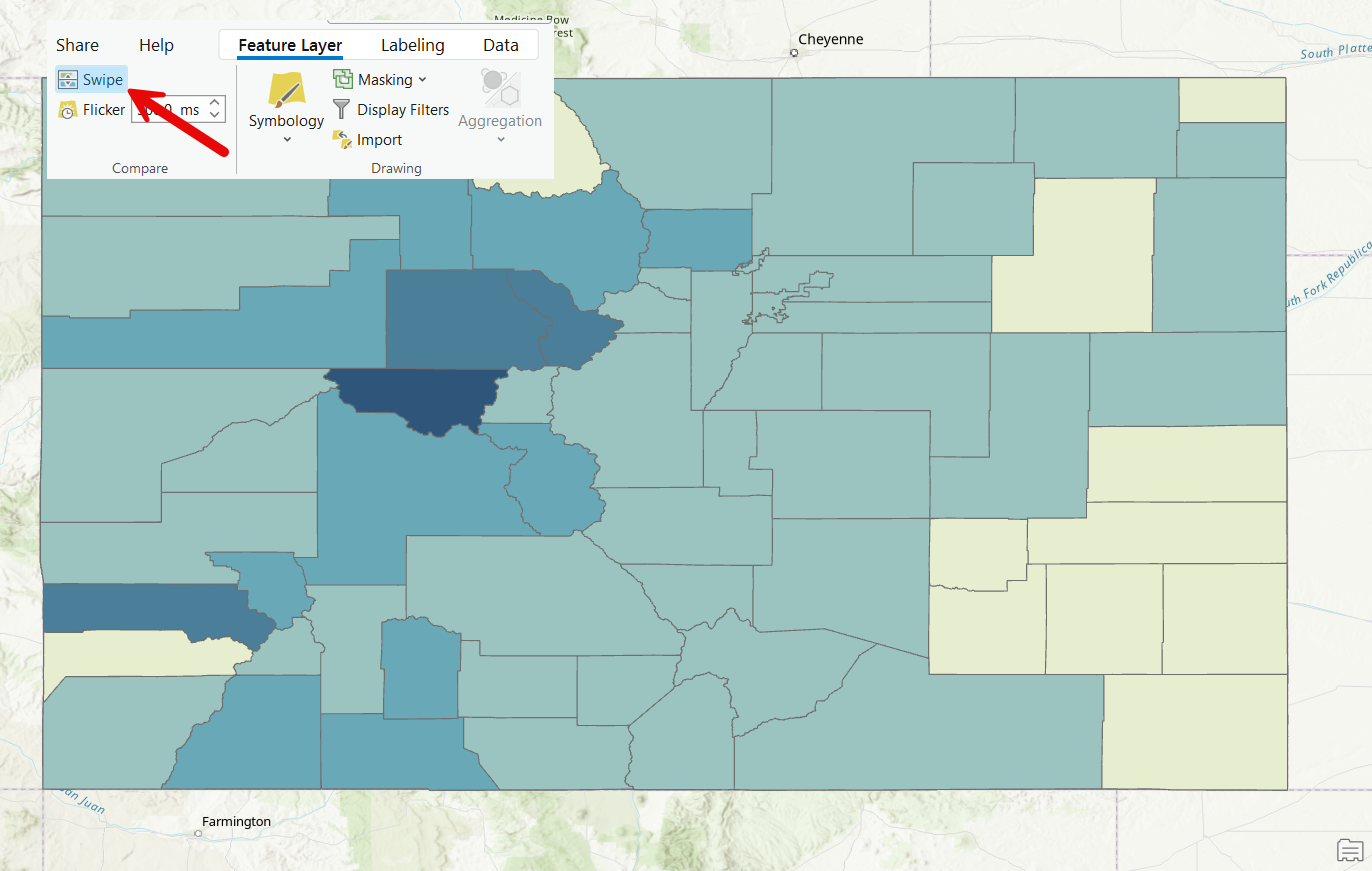
- On the Feature Layer context tab, locate the Compare group and click on the Swipe button.
- Select the Swipe tool.

3. Interact with the Map:
- Click and drag on the map to swipe the selected layer. The swipe bar will move in the direction you drag (horizontal, vertical, or diagonal), revealing the layers beneath. You an see how this works in the video below. In this video the Swipe tool is used to compare the change in home price to income ratio at a county level for the State of Colorado from 2018 to 2023.
4. Adjust for Precision:
- You can use the mouse scroll wheel or pan the map to adjust your view while the Swipe Tool is active.
Practical Applications of the Swipe Tool
1. Change Detection and Temporal Analysis
The Swipe Tool is perfect for analyzing changes over time. For instance, urban planners can compare satellite imagery from different years to assess urban expansion. Similarly, environmental scientists can examine deforestation or land-use changes by swiping between historical and current datasets.
2. Highlighting Infrastructure Development
Civil engineers and city planners often need to showcase the impact of new projects. Using the Swipe Tool, they can overlay project plans on existing infrastructure to visually communicate proposed changes to stakeholders.
3. Disaster Management
In disaster response scenarios, comparing pre- and post-event imagery is crucial. The Swipe Tool enables responders to quickly identify affected areas and plan recovery efforts by swiping between datasets that show the extent of damage.
4. Education and Storytelling
Teachers and GIS educators can use the Swipe Tool in presentations to engage students. For example, swiping between historical maps and modern datasets can illustrate geographic and cultural evolution.
Tips for Effective Use
- Layer Transparency: Use transparency settings in conjunction with the Swipe Tool to enhance the visualization. Adjusting the transparency of the swiped layer can provide additional context.
- Symbology Consistency: Ensure consistent symbology between layers to avoid confusion when swiping.
- Combine with Other Tools: Use the Swipe Tool alongside bookmarks or animations to create interactive presentations.
- Experiment with Directions:** While horizontal swiping is most common, experimenting with vertical or diagonal swiping can add variety and focus attention on specific features.
Conclusion
The ArcGIS Pro Swipe Tool is a versatile and easy-to-use feature that brings data comparison to life. Its ability to visually contrast layers in real time makes it indispensable for GIS professionals, educators, and researchers. Whether you’re analyzing environmental changes, presenting to stakeholders, or teaching spatial concepts, the Swipe Tool offers a dynamic way to interact with spatial data.
Try integrating the Swipe Tool into your next GIS project and experience the power of interactive analysis for yourself!

