What are Digital Elevation Models (DEMs) and derivatives?
A Digital Elevation Model is a raster whose pixel values represent elevations of a surface, most commonly the elevations of the ground. Elevation models are a data type that can be derived from satellite and aerial imagery. There are two main types of elevation models: DEMs, which are raster datasets depicting the earth’s topography as a regularly spaced grid, and triangular irregular networks (TINs), which connect irregularly spaced elevation points with triangular surfaces. There are many variations of DEMs, with a wide range of applications for many disciplines. Examples are viewsheds, elevation profiles and hillshade rasters.
How to create a DEM with ArcGIS Pro
ArcGIS Pro users can create DEMs and derivates with imagery files containing height information. For example, ArcGIS Pro offers access to the World Elevation Services when creating a new 3D Scene as a default data source for displaying elevation data. It’s also possible to bring in other elevation data with a different resolution. Examples are the freely available DEMs of the USA’s National Elevation Dataset (NED) or the USGS 3D Elevation Program (3DEP).
To create a DEM, you can drape a 2D raster file over Esri’s elevation data in a 3D Scene. Let’s suppose you have a geotagged orthophoto of a specified area, such as a multi-band raster image in jpeg format. This can be brought into ArcGIS Pro by adding a folder location in the Catalog pane. Next, you can create a new map by clicking “Insert” on the ribbon interface. You can add the orthophoto to your map by selecting the file in the Catalog window and clicking “Add to new project”. Now, the satellite image is visible in the map window and the Contents pane. Adding a basemap is a good idea to place the image in its spatial context.
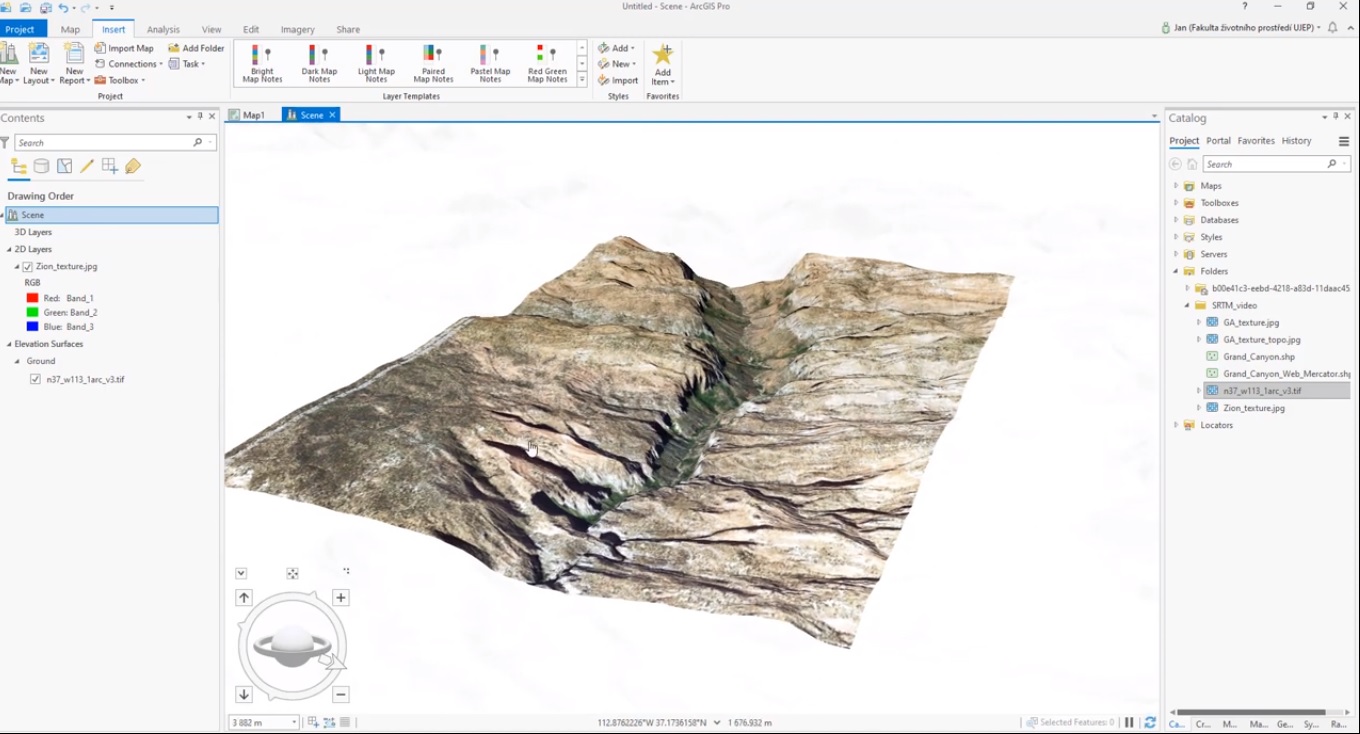
Next, the 2D map window can be used as the basis of a 3D scene with the DEM raster. Choose “Insert”, click “New Map” and next “New Local Scene”. Here, you can drape the satellite image over an elevation data set of your choice and view the result from different angles. You can easily drag and drop the geotagged image file from the Catalog window directly in the map window and see how it is automatically draped over Esri’s elevation data. The result is a DEM, showing the terrain height fluctuations in 3D. You can zoom and rotate the results.
In the Contents pane of the 3D Scene, you’ll see “Elevation Surfaces, Ground, WorldElevation3D/Terrain3D” listed on the bottom of the pane, which refers to the Esri elevation data source that is automatically used when creating a 3D Scene. It is also possible to use your elevation data by clicking “Remove” the Esri data source from the Contents pane, and for example, add a GeoTIFF with elevation data from USGS. Click “Add elevation source” at Elevation Surfaces in Contents pane and you´ll now see a 3D surface in the map window just as before.
Sources:
“Imagery and GIS: Best practices for Extracting information from Imagery”, Esri Press
How to create DEM in ArcGIS Pro, Jan Pacina

