
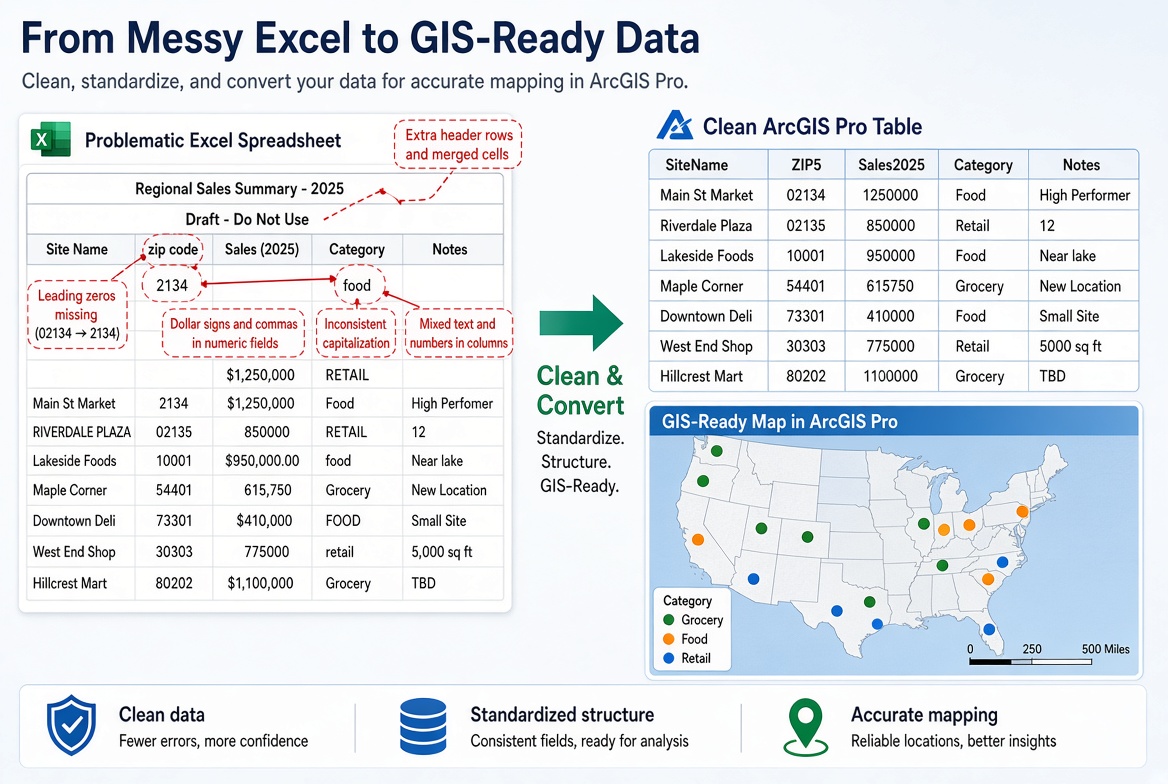
Most GIS data doesn’t start in a geodatabase. It starts in a spreadsheet someone built for themselves: a list of inspection sites, customer addresses, sample points or permit records. Excel is fine with whatever they typed. ArcGIS Pro is not.
When a spreadsheet goes wrong in ArcGIS Pro, it usually looks like one of these:
- ZIP codes and FIPS codes lose their leading zeros, so joins fail.
- A column of numbers shows up as text, so you can’t symbolize or sum it.
- Points land in the ocean, in Antarctica, or in the wrong hemisphere.
- Half the addresses don’t geocode.
- Field names turn into a string of underscores.
The good news is that every one of these has a simple fix, and most don’t need any code. This post walks through a cleanup routine you can use on any spreadsheet before you map it.
Step 1: Fix the layout in Excel first
Some problems are faster to fix in Excel than in ArcGIS Pro. Before you do anything else, save a copy of the workbook and make sure it follows these rules:
- One header row, in row 1. Delete titles, logos, notes and blank rows above the column names.
- One row per record. No subtotal or total rows at the bottom, and no blank rows in the middle.
- No merged cells. Unmerge them and fill in the value on every row.
- One kind of value per column. A “Sales” column shouldn’t have “N/A” or “see note” mixed in with numbers. Leave those cells blank instead.
- Split combined columns. If one column holds “123 Main St, Boise, ID 83702”, split it into Address, City, State and ZIP. Geocoding works better with separate fields.
- One table per sheet. If a sheet has two tables side by side, move one to its own sheet.
Think of each sheet as a database table, not a report. If it looks nice to print, it probably needs work before it goes into ArcGIS Pro.
Step 2: Clean up field names and field types
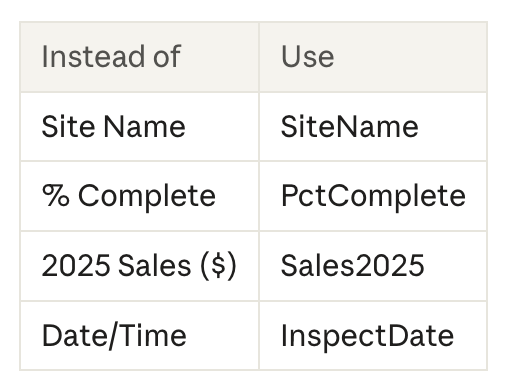
Field names. ArcGIS Pro doesn’t like spaces, punctuation or names that start with a number. It will change them for you, usually to underscores, and the result is hard to read. Rename the columns yourself before you import:
Codes that need leading zeros. ZIP codes, FIPS codes, GEOIDs and parcel numbers are labels, not numbers. If Excel stores them as numbers, the ZIP code 02134 becomes 2134, and a county FIPS code of 01001 becomes 1001. Joins to Census tables or boundary layers will then fail with no error message.
The fix in Excel: select the column, set its format to Text, and re-enter or re-paste the values. If you get the data as a CSV, import it into Excel with Data > From Text/CSV and set those columns to Text during the import, rather than double-clicking the file.
Numbers stored as text. The opposite problem happens too. Values like “$1,250” or “12%” are text to ArcGIS Pro. Remove dollar signs, commas and percent signs in Excel, or fix them later with Calculate Field (Step 5).
Step 3: Bring it into ArcGIS Pro as a table
You can add an Excel sheet straight to a map. In the Catalog pane, expand the workbook and you’ll see each sheet listed with a dollar sign, like Sheet1$. Drag it into the Contents pane and it appears as a standalone table.
That works for a quick look, but for real work, convert the sheet to a geodatabase table first:
- Open the Excel To Table tool (Conversion Tools > Excel).
- Set the input workbook and the sheet.
- Save the output table to your project’s geodatabase.
- Click Run.
Why bother? A geodatabase table is editable, faster, and no longer tied to the workbook. If someone edits the spreadsheet next week, your map won’t change under you.
Then check the fields. Open the new table, right-click its name in the Contents pane, and choose Data Design > Fields. Look at the Data Type column. ZIP and FIPS codes should be Text. Counts and amounts should be a number type (Long, Double). Dates should be Date. Anything that’s wrong here is what you’ll fix in the next two steps.
A note on drivers: older versions of ArcGIS Pro needed a separate Microsoft Access driver to read Excel files. Starting with ArcGIS Pro 3.5, Pro can read .xls and .xlsx files without one. If you get a “Required Microsoft driver is not installed” error, see Esri’s Prepare to work with Excel in ArcGIS Pro page.
Step 4: Find the problems with Data Engineering
Scrolling through a 5,000-row table looking for bad values doesn’t work. The Data Engineering view does the looking for you.
- Right-click the table in the Contents pane and choose Data Engineering.
- In the fields panel on the left, select the fields you want to check.
- Right-click and choose Add To Statistics And Calculate.
You get one row per field with counts, nulls, minimum and maximum values, unique values and a small chart. Here’s what to look for:
- Nulls. How many records are missing a value? Right-click the null count to open the Fill Missing Values tool if you want to fill them.
- Min and max. A latitude of 350 or an inspection date in 1900 is a typo.
- Unique values on text fields. “TX”, “Tx”, “Texas” and “TX ” (with a trailing space) are four different values to ArcGIS Pro. Spotting them here saves a lot of pain when you symbolize by category.
For a closer tour of the view, see our earlier post, Unlocking the Power of the Data Engineering Tool in ArcGIS Pro.
Step 5: Fix values with Calculate Field
You can’t change a field’s type once it has data in it. Instead, add a new field of the right type and calculate the values into it. Here are the fixes that come up most often. Each one uses Calculate Field with the Python expression type, and you can copy the expression as-is.
Restore leading zeros on a ZIP code. Add a new Text field (for example, ZIP5) and calculate it:

Use zfill(5) for county FIPS codes, zfill(2) for state FIPS codes and zfill(11) for tract GEOIDs.
Turn “$1,250” into a number. Add a new Double field and calculate it:

Trim extra spaces and fix capitalization. Calculate a text field onto itself:

Turn text dates into real dates. If a date came in as text, like “03/15/2026”, use the Convert Time Field tool rather than Calculate Field. Set the input format to match how the dates are written (MM/dd/yyyy in this example) and the output to a Date field.
Two tips. First, if a record has a blank value, some of these expressions will fail on that row. Select only the rows with values before you calculate. Second, once the new field looks right, you can delete the old one and use Alter Field to give the new field the old name.
Step 6: Put it on the map
With a clean table, there are two ways to turn rows into points.
If you have latitude and longitude: XY Table To Point
Open the XY Table To Point tool, choose your table, and set the X and Y fields. Most problems come from three mix-ups:
- X is longitude, Y is latitude. It’s easy to get these backwards, since we usually say “lat/long.” If your points show up in the wrong place entirely, swap them.
- Missing minus signs. Everywhere in the United States has a negative longitude (for example, -98.49 for San Antonio). If your points land in western China, the minus signs are missing.
- Wrong coordinate system. If the values look like 2,130,000 instead of -98.49, they aren’t latitude and longitude. They’re probably State Plane or UTM. Ask where the data came from and set that coordinate system in the tool.
If the coordinates are written as degrees, minutes and seconds (like 29°25’27″N), use the Convert Coordinate Notation tool instead. It reads that format and creates points.
If you have addresses: Geocode Addresses
Open the Geocode Addresses tool, choose your table and a locator, and map your Address, City, State and ZIP fields to the locator’s fields. The cleanup from Step 1, especially splitting combined address columns, pays off here.
After it runs, check the Status field. Records marked U (unmatched) or T (tied) need a look. The Rematch Addresses pane lets you review and fix them one at a time.
One caution: the ArcGIS World Geocoding Service uses ArcGIS Online credits when you geocode a table. Run a small test batch first so you don’t spend credits on a file full of bad addresses.
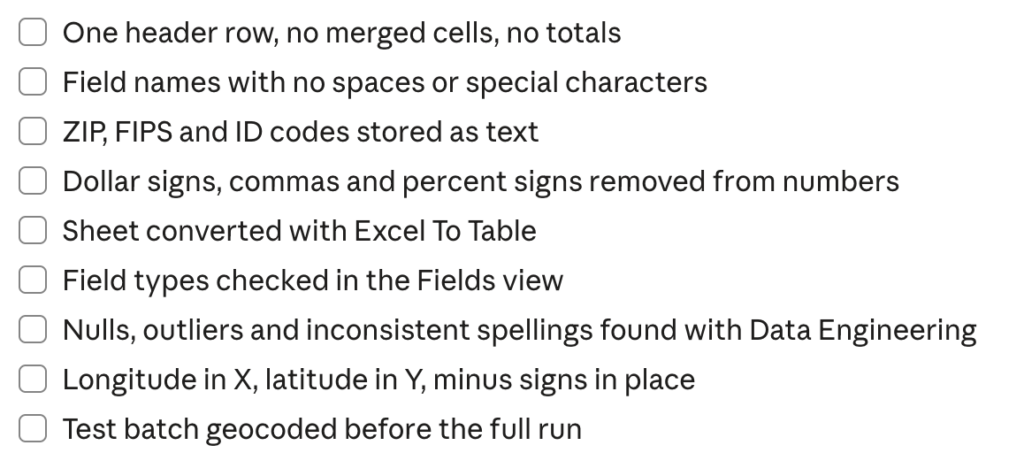
A quick checklist
Print this out or keep it next to your desk for the next spreadsheet that lands in your inbox.
Ten minutes of cleanup up front saves hours of chasing bad joins and misplaced points later.
Want to go further? Our Introduction to the Geodatabase in ArcGIS Pro class covers field types, tables and data design in more depth, and it’s included in the Annual GIS Training License.
