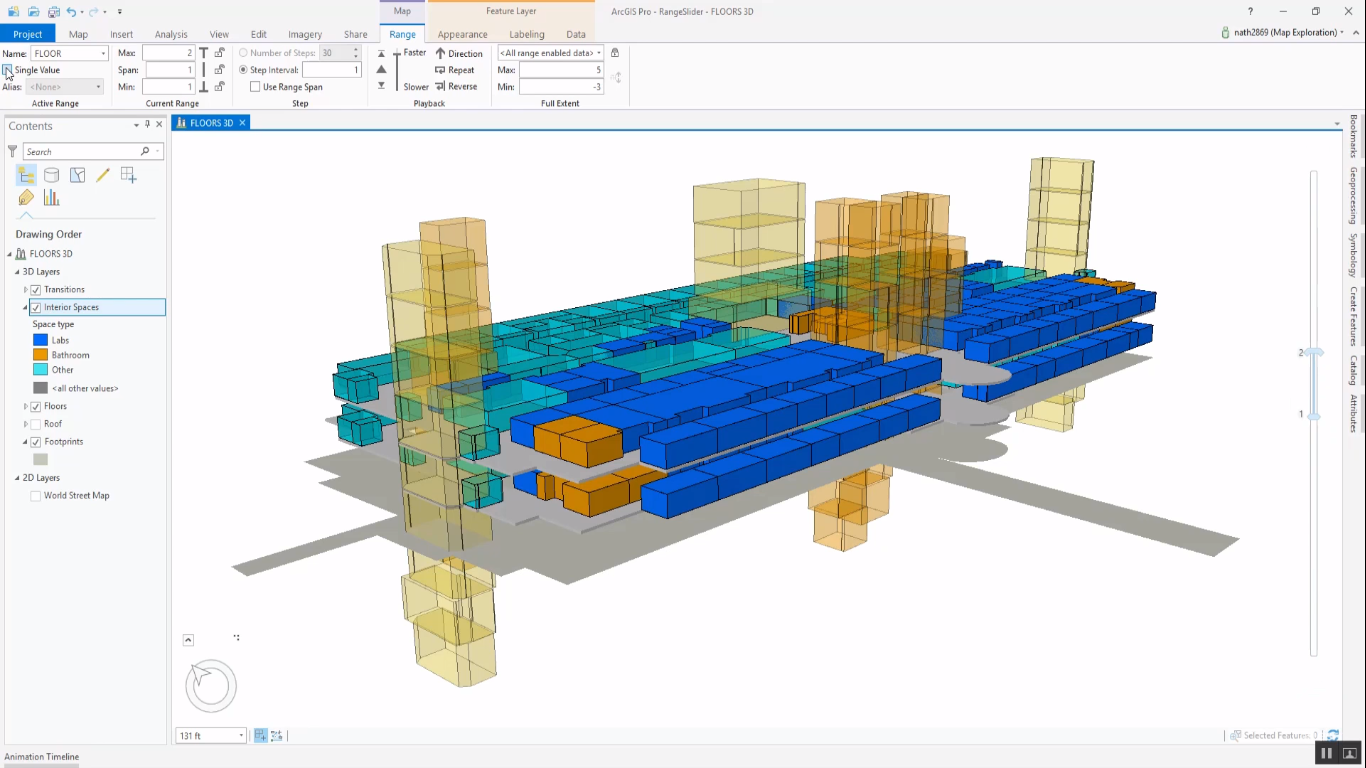
This article describes how to use the Range Slider tool in ArcGIS Pro that functions as a display filter for 2D and 3D data.
Each layer in ArcGIS Pro comes with a set of properties, that can be accessed and managed through the Layer Properties dialog window. The Layer Properties of a single feature layer can be accessed by double-clicking on a feature layer of choice in the Contents pane, or by right-clicking a layer and selecting ‘properties’, after which the Layer Properties dialog opens up. Layer properties are shown as a list of headers on the left side of the screen (General, Metadata, Source, Elevation, etcetera), with on the right the different corresponding settings of each property, that can be edited by the user.
The range property enables selecting a numerical range field for the Range Slider tool, which is a display filter to show only a selection of a feature layer, while all feature layer content is accessible to the layer. Notice how this is different from creating a subset of your data before displaying it, for example by using a definition query. The numeric range can be connected to any number field from the layer’s corresponding attribute table, meaning a numeric field. An example would be floor number for displaying a 3D building, maximum occupancy, or room area.
Filtering the map display using the Range Slider control bar
To define the range for one or more feature layers, you first need to open the range tab on the layer properties dialog and specify the numerical field of choice. Pro uses a range alias that corresponds to the field name of choice, but these can be defined by the user as well. After selecting a range value, a vertical range slider control bar is displayed on the right of the map window that shows the current range for the entire map. Inside this control bar, the feature layer content display can be manipulated in real-time by manually changing the extent values. It’s also possible to filter multiple layers together using the same range name.
When the layer’s field names are connected to an integer field, the range slider control can be collapsed down to a single value mode. An example would be to a building with multiple floors, using the floor number as the field range name. Instead of displaying the vertical range slider control bar, Pro shows a small menu bar where the user can select the different integer values, such as floor numbers. With less than 100 unique integer values, it’s possible to define a display alias expression. This way, you can present the user a value that better reflects the name that corresponds to the integer value, such as floor name (instead of a floor value indicating a floor number).
Layers can have more than one defined range. However, only one range can be active at a time. Toggling between different range names is done with the Range Sider control in the ribbon interface, by choosing a different Name value in the drop-down menu on the top-left part of the screen. Because this menu option is directly available to the user, there’s no need to open up the Layer Properties dialog first, which makes for a great user experience. The Range Slider can be used together with other filters, such as the time slider or definition queries so that content can be managed through space, time and numeric ranges.

