
In this tutorial, you’ll learn how to calculate the area of a polygon dataset and sort the results.
If you have a set of polygons, you can use easily calculate and add the area of each polygon to its attribute table. This is what we’ll do in this tutorial for a set of polygons that represent lakes around the world. Although these polygons do not have a field that represents their area, we can do this ourselves and sort the results so we can see which ten lakes have the largest area around the world.
STEP 1: Download the data and create a new, empty project in Pro
Open Pro and create a new project using a map template. We’ll be using the Natural Earth quick start kit dataset, that can be downloaded here. Add a folder connection by clicking on the folder icon in the Catalog pane and choose the data folder with the downloaded dataset. You are now able to add data directly from this dataset to the map window, which is what we’ll do next.
STEP 2: Add the data and create a new field for area calculations
Drag the ne_110m_lakes.shp file (found in the 110m_physical subfolder) to the map. Open the attribute table and notice there are 25 features in total. There is no field that lists the total area, so we’ll have to create a new, empty field to store these later. To do this, click the “Add” button in the top-left corner of the attribute table. A new tab opens, named *Field ne_110m_lakes. In the field name column, type “area” and then right-click in an empty field to save the field name:

STEP 3: Calculate the area of the individual lake polygons
Close the *Field ne_110m_lakes tab and head over to the far-right of the ne_110m_lakes attribute table, where a new column has been added named “area”. Right-click the column name (“area”) and select “Calculate Geometry”. Use the following tool parameters and click “OK” to calculate the area for each record (lake polygon) of the attribute table:
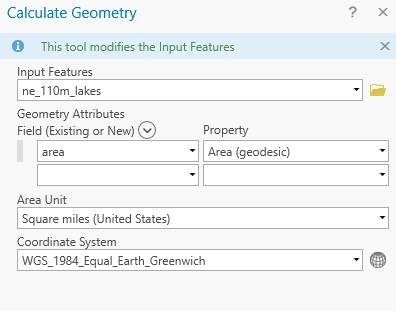
With regards to the coordinate system, the one that is chosen preserves area for the entire globe, which is required as we will be comparing the areas of large shapes around the globe. More info here.
STEP 4: Sort the results and display the map in the correct coordinate system
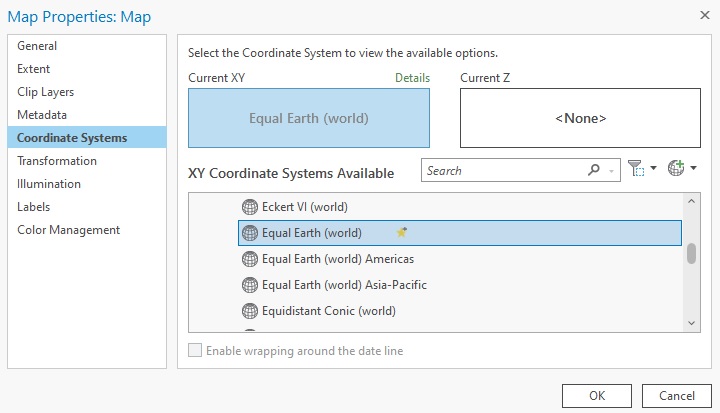
The attribute table’s “area” column has now been populated with field values as a result of using the Calculate Geometry feature in the last step. To sort the results, right-click the column name “area” and choose “Sort Descending” so you’ll see the lakes with the largest areas first. Then, in the table of contents, right-click “Map” and choose “Properties”. Under “Coordinate Systems”, make sure you set the Current XY field to “Equal Earth (World)”:
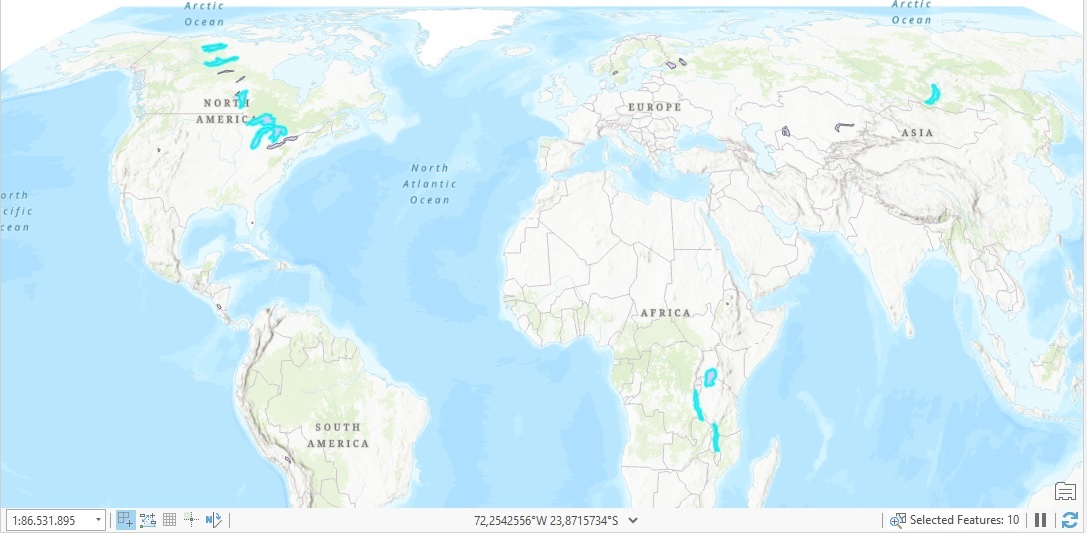
Click “OK” and in the attribute table of ne_110m_lakes, select the first 10 records by holding the Shift key. Then, right-click the ne_110m_lakes layer in the contents pane and select “zoom to layer”, so that the ten features will be all visible in the map window:
Learn more about ArcGSI Pro in these classes:
