
ArcGIS Pro 2.7 introduces a new tool for applying visual effects called layer blending. We’ll have a look at different ways to apply layer blending with raster layers.
What is layer blending?
Layer blending is a feature that has been available in QGIS for some time but was first introduced into ArcGIS Pro 2.7. It is a visual effect where an entire layer is blended with a background layer to create more visually attractive results such as brightening or darkening of color ranges. This way, you can visually enhance features and change map design for publication. This feature offers more variety and control in using transparency than the already present Transparency tool.
When layer blending is selected by the user, Pro runs a computational process that changes the color values of a layer for each color channel independently. The drawing order of your layers in the table of contents is important here as the selected layer is blended with the one directly below it.
The layer blending tool is found in Pro in the Appearance tab under Effects, right below the Transparency slider. Clicking the Layer Blend dropdown menu shows a total of nineteen different Blending modes, divided into four different categories: Normal, Lightening Modes, Darkening Modes, Divergent Modes and Color Combination Modes. The Normal mode can be regarded as an “undo” function to return to the layer visualization before using the tool which is not really a blending mode, so there are in total only eighteen different blending modes. The different calculations for each mode are explained here, but the best visual results depend on the intention of the user and the data contained inside the layers that are blended. Let’s have a look at some examples below.
Blending mode examples
As the name indicates, layer blending is meant for layer files. For nice visual results, we use large-area raster layers for the examples below to give you an idea of what the tool is capable of. For the sake of completeness, ArcGIS Pro 2.7 also included a Feature Blend tool that is found right below the Layer Blend tool that works well for highlighting where certain features in the same layer overlap.
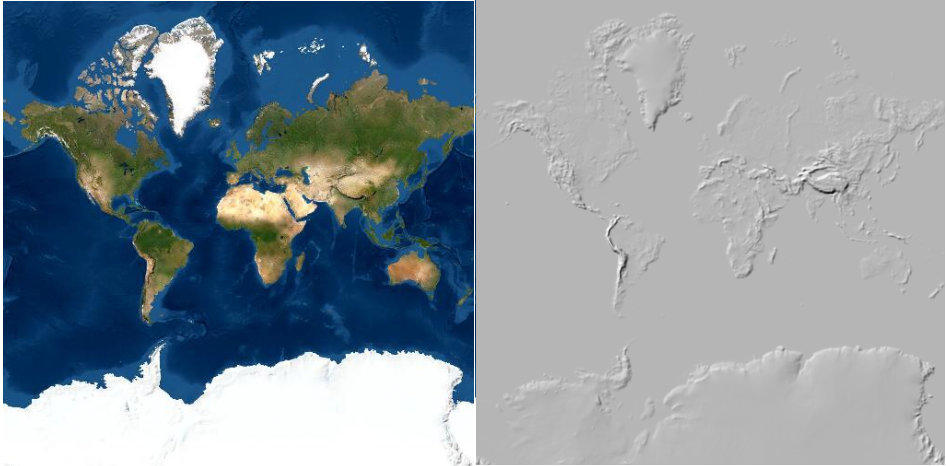
Extending on an example suggested here, we create a new project in ArcGIS Pro and load two raster layers: a World Imagery and the Terrain Hillshade basemap. The first layer provides a hillshaded surface (a single band greyscale image), while the second one is a colored image layer built from aerial and satellite imagery. Both are available from the Living Atlas. We will blend the greyscale image with the color image to visually emphasize mountain ranges in the Iberian Peninsula in Southern Europe. Here’s how both individual layers look without any form of visual effects:
Lightning mode examples
The different Lightning mode options blend the hillshade layer with the imagery layer below it, resulting in lighter layers. From left to right, the modes used are Screen, Color Dodge, Lighten and Linear Dodge. Although the mountain ranges are clearly visible in all four images, the blending results are too light. Lighten mode (the third image from the left) makes a comparison between the two images and keeping only the highest color value, which explains why there are almost no visible colors except grey.

Darkening mode results
Using darkening mode layer blending, the results show a much better blend of both images. From left to right, the different blending modes are called Multiply, Color Burn, Darken and Linear Burn. The third image from the left, showing the Darken mode, displays only the smallest value of both images and is very similar in color when only the World Image basemap layer is displayed. However, the Multiply blending option (the first image from the left, where the values of both images are multiplied) displays the mountain range better than the Darken blending option.

Divergent mode results
Divergent blend modes are a combination of lightening and darkening modes and are scaled so that the effect is at its maximum where the background is completely black or white. From left to right, the different modes are Overlay, Hard Light, Soft Light, Linear Light, Pin Light and Vivid Light. The mountain ranges are clearly visible in all images, but the background image colors do not always come out well, except for the first and third image from the left.

Color combination modes results
These blending modes require converting color values to and from the HSL color model before and after the blend, which may result in changes to some color values. From left to right, the blending modes are Luminosity, Saturation, Hue and Color.

With three out of four images that are black and white, almost all the results lose the color values of the background image. The first mode, Luminosity, shows the mountain range in the clearest way of these modes and also has a nice uniform color for the surrounding water. For a thematic map, this would be a good choice. This blending mode uses the luminosity from the hillshade layer and the hue and saturation of the background color image layer.
