This blog post tells you how to install and get started with the ArcGIS-R bridge.
Installing the ArcGIS-R bridge
The installation for both ArcMap and ArcGIS Pro is pretty straightforward: after a clone or download from its GitHub repository, you can find detailed installation instruction of the tool in a readme.md file that can be opened with a code editor such as Sublime Text 2 or Brackets. This documentation contains a URL to a 16-page PDF with documentation of the tool that is recommended to read before getting started.
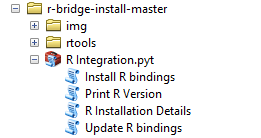
In order to install the ArcGIS-R bridge, you need to run a script called “Install R bindings” from the Catalog window ArcMap to install the tool. In Pro, you need to select the Projects pane and add the toolbox through Toolbox -> Add Toolbox, open it and run it from there.
Getting started
If everything works, you are able to access ArcGIS data from R. R works best by using an IDE of your choice, the most popular one being RStudio. From here, you can load the arcgisbinding ArcGIS-R bridge library you have just downloaded and installed, by initializing a connection to ArcGIS by typing the following code in the console:
>> library(arcgisbinding)
When you hit enter, you will be asked to have R define your ArcGIS desktop license, like this:
>> arc.check_product()
After running this command, the console will print your product and license. You´re now ready to read in your spatial data from ArcGIS by selecting a data source, which can be a feature class, layer or table:
>> Input <- arc.open(´mygeodatabase.gdb/myfeatures´)
If necessary, you can make a selection of this data source by using arc.select() and specify a SQL query that selects only a subset of the data you´ve just read in with arc.open(). By using arc.select(), a dataset is loaded to a standard data frame. A data frame in R is used for storing data tables, containing a list of vectors of equal length.
>> Filtered.df <- arc.select(input.fc, fields = “*”, where_clause = “”)
For performing analysis in R with this spatial data, it needs to be represented as sp objects. R users will be familiar with sp, a package that provides classes and methods for spatial data. The arcgisbinding package provides the Arc.data2sp function, which performs the conversion to sp objects:
>> df.as.sp <- arc.data2sp(filtered.df)
Now you´re ready to use R functionality on your spatial data – this is why the tool was created after all. Afterwards, you can your results back to a new feature class with arc.write and access it in ArcMap or Pro by refreshing the work map where the data sits:
>> arc.write(‘mygeodatabase.gdb/my_new_features’, myresults.df)
Changing RStudio to a 32 or 64 bit-version
Depending on if you´re using ArcMap or Pro, you need to use a corresponding 32-bit or 64-bit version of RStudio. If RStudio prompts you to use a different version than the one you´re using now, there´s no need to install a second version of RStudio, but instead change the current version to the preferred one by choosing Tools -> Global Options and clicking “change” on the right where it says “R Version”, which is the first option of the menu. Such a change may be necessary as RStudio’s default version corresponds to the installed version of R and not ArcMap or Pro. If you´re running ArcMap and Pro on the same machine and use the ArcGIS-R bridge, this can come in handy.

