This article explains how to create a new task item in ArcGIS Pro. Also, some advice is offered before considering the creation of a new task.
Creating a new task item
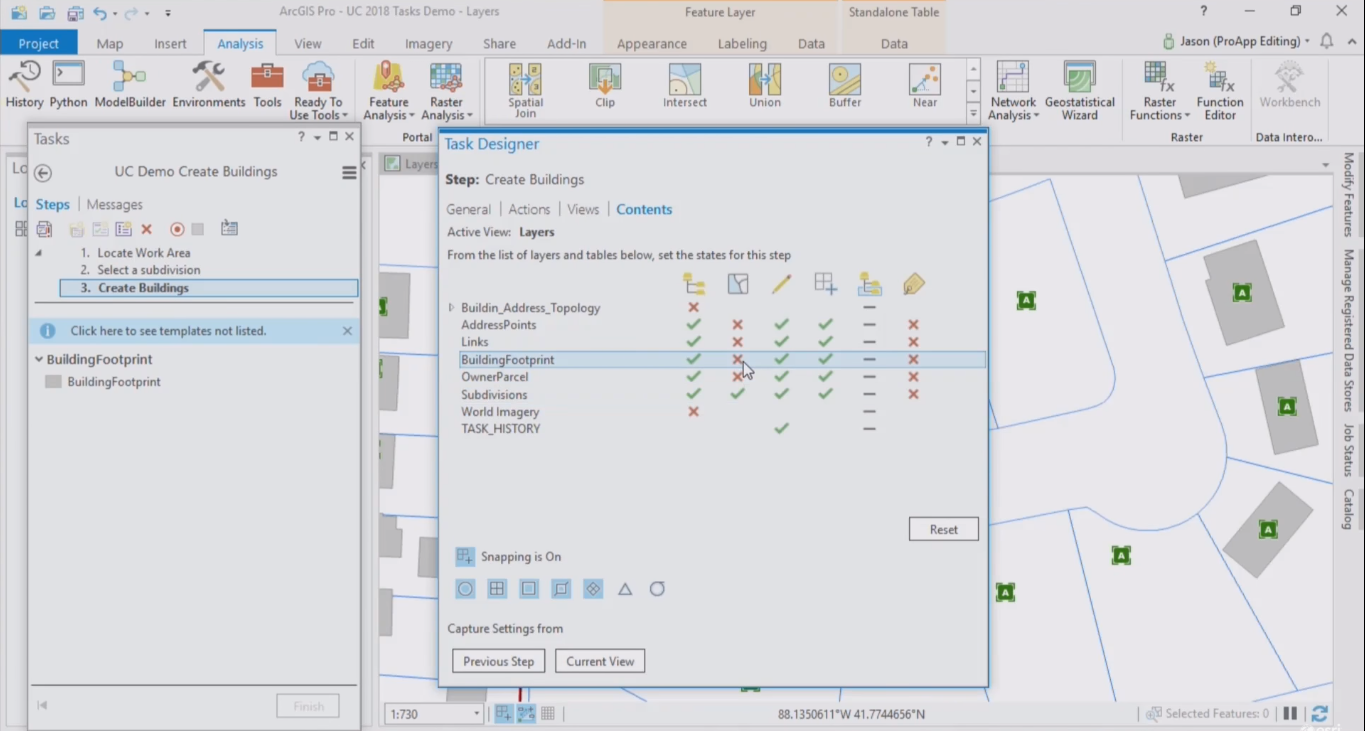
Creating a task starts with creating a new task item inside a project in Pro. Tasks are listed in the Catalog pane under “Tasks”. Creating a task item can be done as follows: start by clicking the “insert” tab and then the Task arrow and then “New Task Item”. Next, the Tasks and Task Designer panes are opened. It’s good practice to dock the task pane and task designer side by side as it makes it your work easier.
In the task designer pane, you need to enter a name and, optionally, an author for a new task item, followed by a summary, name, description, tags, version number and use limitations in case there are special restrictions for the user regarding the use of content. To save the task item, save a project and close the task designer pane or click “New Task” in the Task pane. A task item can be edited in the Task Designer pane.
Creating a new task
After creating a task item, it is possible to create a new task inside a task item. Additionally, you can add a new task to an existing task item. Creating a new task is done as follows: open and edit a task item by right-clicking a task item in the Catalog pane and clicking “Edit in designer” next. A new, empty task is created by clicking “New task” in the Tasks pane. The properties of the new task are displayed in the Task Designer, where you can enter a name and description of the new task. Additional task steps can be added using the “New Step” button inside the Task Designer. After creating a task step, you need to configure it with step actions (containing commands or tools that are needed to complete a task step, or dialog boxes prompting a user to enter attribute values). Commands and tools can be selected manually and recorded by Pro using a recording tool. Task steps can also be configured to manage feature selections at different moments, for example right before executing a command or when moving to the next step. Similarly, a task step can be configured to manage attributes of layers and tables. Task step configuration also lets you manage which maps, scenes, and layouts are viewable during a single task step, as well as the contents that are visible, selectable and editable.
Information to ask yourself before designing a task
When designing a task in ArcGIS Pro, you are translating organizational procedures and workflows in a stepwise process inside of ArcGIS Pro. A good understanding of your organization, users and the ArcGIS Pro project environment is required to create a task that is an example of “best practices”. With regard to your organization, this means you need to understand current workflows. Also, the workflow for which you want to create a task needs to be repeatable to be eligible for a task. If not, there’s no sense in creating it. With regards to the ArcGIS Pro environment, you need to know what maps, layers, tools, and add-ins exist to include them into a task. Information about your users will be of help when designing a task, such as user roles, license level, product extensions, permissions, and environment information.
When not to use tasks The motivation for using tasks should be to improve efficiency and quality inside an organization. If a workflow takes a very long time, it’s not a good idea to create a task for it as it probably won’t save the user any time. Also, if task resources such as maps, layers, and geoprocessing tools change frequently, tasks may not be a good solution as existing tasks may need to be reconfigured because of their dependence on these resources. Tasks are also not meant to be used as micromanagement tools to restrict users from using other tools while performing a task. Finally, creating a task can be a good and efficient alternative to creating an add-in as it offers customization that was only available through add-ins in the past.

