

Save 20% on our GIS training through May 31st by using the discount code springsale when checking out.
Why Topological Accuracy Matters
In GIS, adjacent polygons must meet seamlessly to support reliable spatial analysis. Gaps or overlaps between features can lead to incorrect area calculations, taxation errors, misaligned zoning boundaries, and other data integrity issues. Maintaining clean topological relationships is essential in parcel mapping, utilities, land management, public safety, and planning workflows.
This article explores practical tools and techniques in ArcGIS Pro for creating adjacent polygons without introducing gaps or overlaps. It provides pros, cons, and when to use (or avoid) each method to help GIS professionals maintain spatial integrity.
1. Snapping: Essential, but Not Foolproof
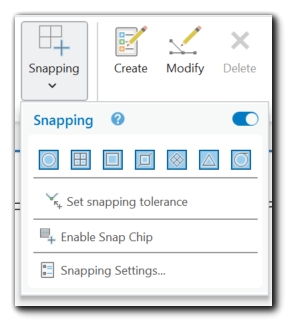
Snapping helps align vertices, edges, and intersections while editing or creating polygons. It is accessed from the Edit tab → Snapping group.
Pros:
-
Ensures features connect precisely at shared edges or vertices.
-
Supports multiple snapping types: vertex, edge, intersection, end snapping.
-
Customizable snapping tolerance allows control over snapping sensitivity.
Cons:
-
Snapping is scale-dependent:
At small scales (zoomed out), snapping tolerances may cause misalignments or missed snaps. -
Complex intersections can sometimes confuse the snapping engine, especially when multiple vertices or edges are close together.
When to Use:
-
Always enable vertex and edge snapping when creating adjacent polygons.
-
Use intersection snapping when aligning to known crossing points.
When Not to Use:
-
Avoid relying solely on snapping when working at broad zoom extents or with highly detailed boundaries—it may fail to register subtle misalignments.
Pro Tip:
Use the Snapping Toolbar to toggle snapping modes on or off while editing for precise control.
2. Trace Tool: Following Existing Edges Precisely
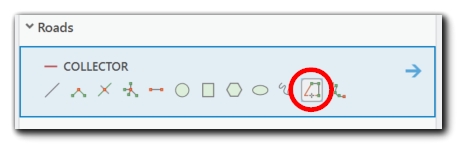
The Trace tool (found in the Create Features pane → Construction tools) allows you to trace the boundary of existing features to construct a new polygon.
Pros:
-
Accurately follows the edge of existing polygons, reducing manual digitizing errors.
-
Useful for shared boundaries like parcels, zoning districts, or easements.
Cons:
-
Zoom level impacts tracing precision:
If zoomed out too far, tracing may miss fine details, especially with complex geometries like curves or densely vertexed lines. -
If the traced feature has geometry errors (e.g., dangles, overshoots), the traced line will inherit these issues.
When to Use:
-
Use when creating adjacent features that must perfectly align with existing polygons (e.g., parcel splits, zoning updates).
When Not to Use:
-
Avoid if adjacent features contain geometry errors—validate those first.
-
Don’t rely on tracing at broad extents without zooming in to ensure detailed control.
3. Auto-Complete Polygon: Fast Adjacent Feature Creation
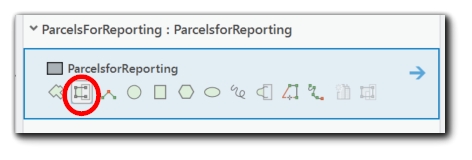
The Auto-Complete Polygon tool (within the Create Features pane) allows you to draw new polygons adjacent to existing ones, automatically filling in the shared boundary.
Pros:
-
Speeds up adjacent polygon creation by handling the shared edges automatically.
-
Reduces manual snapping effort on shared boundaries.
Cons:
-
If the existing boundary is inaccurate, the new polygon inherits these errors.
-
Topology violations (gaps or overlaps) may still occur if adjacent features are not validated beforehand.
When to Use:
-
Ideal for parcel splits, zoning boundary adjustments, or creating contiguous administrative units.
When Not to Use:
-
Avoid when adjacent polygons are not validated—always run a topology check first.
4. Align Features Tool: Refining and Standardizing Boundaries
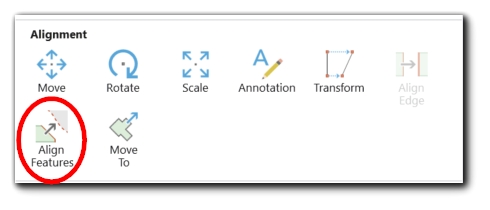
The Align Features tool in ArcGIS Pro allows GIS professionals to realign edges or vertices between features to ensure consistency and clean shared boundaries. It is especially useful for adjusting existing polygons that might not line up perfectly after edits.
This tool works by aligning selected features to reference features. It offers flexibility in how the alignment occurs—you can align to edges, vertices, or a specific direction.
Found in the Edit tab → Modify Features pane → Alignment group → Align Features.
Pros:
- Allows for precise adjustment of shared edges or vertices, improving spatial alignment between features like parcels, zoning districts, or utility areas.
- Supports different alignment methods:
- Align to edges of reference features.
- Align vertices to nearby vertices.
- Align edges to a specific direction (e.g., due north).
- Distribute vertices evenly along a line.
Cons:
- May oversimplify complex geometries:
- Aligning detailed, curved boundaries can result in loss of original shape fidelity.
- Does not enforce topology rules:
- It simply adjusts geometries without checking for gaps or overlaps.
When to Use:
- Use after creating polygons when shared boundaries need to be cleaned up or standardized.
- Ideal for realigning parcel lines, easements, or zoning boundaries that should share edges but don’t perfectly align due to digitizing inconsistencies.
When Not to Use:
- Avoid in natural feature datasets (like rivers or coastlines) where organic curves and variability are important.
- Do not use as a replacement for topology validation—it’s a manual adjustment tool rather than an error-checking tool.
- The Align Features tool complements other editing workflows (such as Auto-Complete Polygon), providing an essential way to refine spatial alignment and ensure polygon integrity.
5. Complete Polygon (Parcel Fabric): Seamless Parcel Construction
Complete Polygon, available in Parcel Fabric workflows, allows you to close a parcel polygon by snapping to existing boundary lines, creating a seamless adjacent feature. This is also referred to as “
Pros:
-
Ensures parcels close properly against existing boundaries.
-
Reduces manual digitizing effort for shared boundaries.
Cons:
-
Perpetuates existing inaccuracies: If the adjacent boundary is incorrect, the new polygon inherits the same errors.
-
Available only within Parcel Fabric workflows.
When to Use:
-
Use in Parcel Fabric environments when creating adjacent parcels.
-
Ideal for highly regulated cadastral mapping where parcels must close properly.
When Not to Use:
-
Avoid if adjacent parcel boundaries are suspect—review and correct those first.
6. Validate Topology: Enforce Rules and Catch Errors

Topology validation can be invaluable. By defining spatial rules that govern how features relate to one another, topology validation helps ensure polygon integrity across your dataset.
In ArcGIS Pro, topology is managed through geodatabase (including File Geodatabases) topology, which allows you to define rules that reflect the requirements of your data. For example, in a parcel dataset, you might specify that parcels must not overlap or that gaps between parcels are not allowed.
Pros:
-
Automatically detects gaps, overlaps, slivers, and other topological issues.
-
Supports custom rules based on project needs.
Cons:
-
Initial setup can be time-consuming.
-
Must be run periodically—doesn’t enforce corrections automatically.
When to Use:
-
For ongoing projects where data integrity must be maintained (e.g., tax parcels, zoning layers).
-
Use before finalizing edits or before publishing datasets.
When Not to Use:
-
Avoid for one-off edits where topological relationships aren’t critical.
7. Align Edge Tool: Refining Shared Boundaries
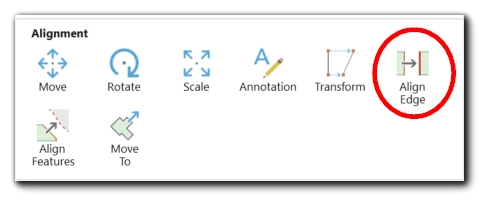
The Align Edge tool (found in Modify Features → Alignment group) allows you to align one edge to another, ensuring clean adjacency.
Pros:
-
Ensures straight, clean edges or aligns them to reference features.
-
Allows for bulk adjustments of shared boundaries.
Cons:
-
Works best with simple geometries—complex, curved boundaries may require manual refinement afterward.
-
May oversimplify detailed boundaries if overused.
When to Use:
-
Use for simplifying shared boundaries between adjacent polygons (e.g., parcel edges, zoning lines).
When Not to Use:
-
Avoid in complex curved geometries where precision detail is required.
Conclusion: Tools for Reliable Polygon Integrity
Maintaining gap-free, overlap-free polygons is crucial for accurate spatial analysis. Each tool, Snapping, Trace, Auto-Complete Polygon, Complete Polygon, Topology validation, and Align Edge, offers unique strengths. By understanding when and how to use each method, GIS professionals can build reliable, high-quality datasets that support everything from parcel mapping to utility management.
