

Labeling features in ArcGIS Pro is a powerful way to enhance the readability and functionality of your maps. Labels provide essential information about features, such as names, measurements, or any other attribute data associated with them. However, not all features should be labeled the same way, and that’s where label classes come into play. In this post, we’ll dive into the concept of label classes, how they work in ArcGIS Pro, and how you can use them to improve your maps.
What Are Label Classes?
Label classes in ArcGIS Pro allow you to define different labeling rules for the same layer based on attribute values or other criteria. Instead of applying a single, uniform labeling style across an entire layer, you can create multiple classes to differentiate how labels are presented for different types of features within that layer. This is especially useful when working with complex datasets where features vary in type, importance, or characteristics.
For example, in a layer displaying a road network, you might want to create different label classes for highways, main roads, and secondary streets. Each class can have its own text size, font, color, and placement options to visually distinguish them on the map. This approach ensures that important features are more prominent and easily readable while providing clarity and context to the map’s users.
Creating and Managing Label Classes in ArcGIS Pro
To create and manage label classes in ArcGIS Pro, follow these steps:
- Open the Labeling Pane:
- Select the layer you want to label in the Contents pane.
- Click on the Labeling tab at the top of the ArcGIS Pro interface.
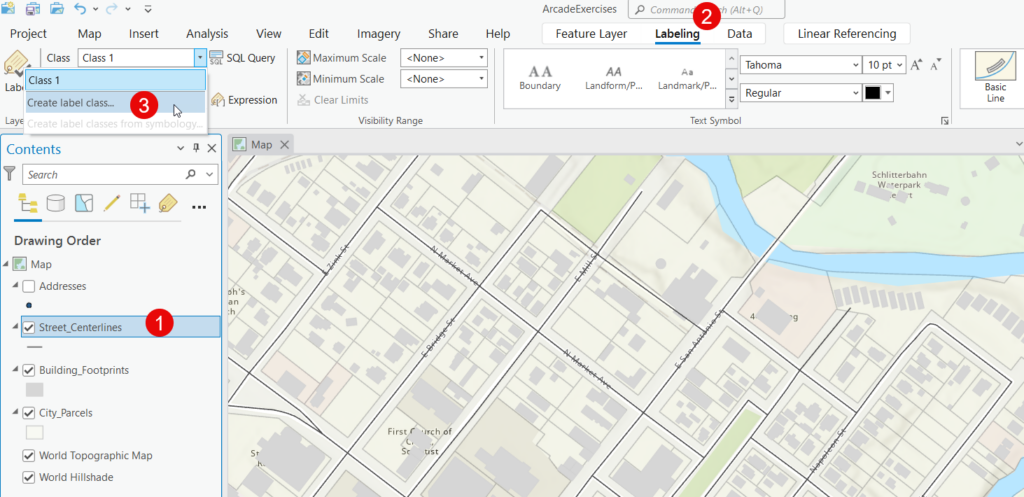
- Every layer has a default label class called “Class 1”. You can see this in the Class dropdown list. However, you can create any number of additional label classes.
- In the Label Class section, click Create Label Class from the Class dropdown as seen in the screenshot below.
- Define a Label Class:
- Give your new label class a name that represents the type of features it will label, such as “Highways” or “Secondary Roads.”
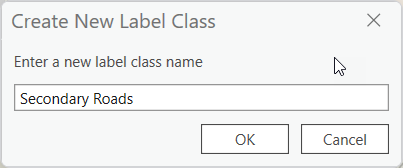
- With the new label class created you can define the parameters including the field to use for labels, visibility ranges, text symbols, and label placement.
- Give your new label class a name that represents the type of features it will label, such as “Highways” or “Secondary Roads.”
- Customize the Label Appearance:
- Customize the font, size, color, and placement of the labels for each class to differentiate them visually.
- Use label placement options such as Above Line, Below Line, or Along Line to control how labels appear relative to features.
- Optionally define an Arcade expression
- You can also use Arcade to create custom label expressions for label class. Learn more about how Arcade can be used for custom label expressions in this video. Click the Expression button to display the Arcade expression builder interface. For instance, you might specify that all features with a
ROAD_TYPEattribute equal to “Highway” should be labeled using this class. - In the screenshot below notice that I have used the Arcade Proper() function to convert the street names from all uppercase to proper case (first letter of each word is uppercase and all other letters are lowercase).
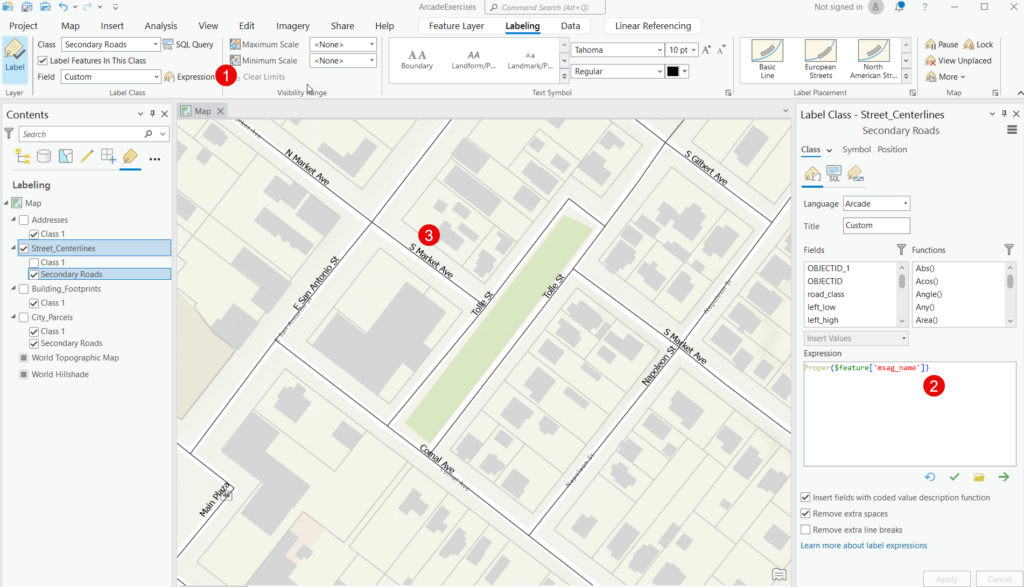
- You can also use Arcade to create custom label expressions for label class. Learn more about how Arcade can be used for custom label expressions in this video. Click the Expression button to display the Arcade expression builder interface. For instance, you might specify that all features with a
- Apply Labeling Rules:
- Adjust the visibility of each label class based on the map scale. For example, you might choose to display highway labels at smaller scales while showing secondary road labels only at larger scales.
- Use priority and weight settings to manage label conflicts and determine which labels take precedence when there are overlaps.
Changing the Label Class
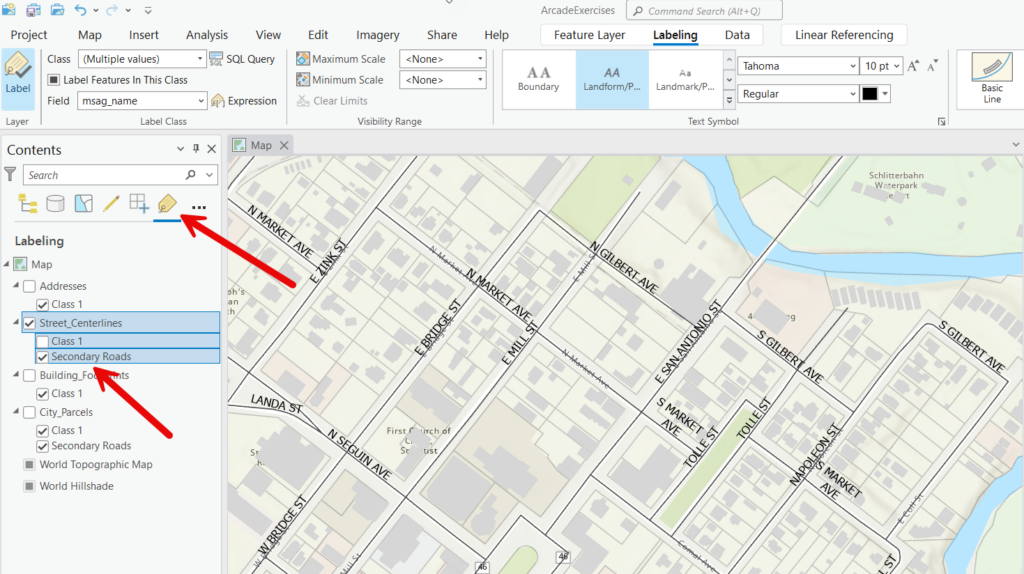
The currently active label class can be set either by selecting the class from the dropdown “Class” box under the Label Class section of the Labeling tab or by clicking the check box next to the class name in the List by Label section of the Contents pane (see below).
Examples of Using Label Classes
1. Labeling Land Use Categories in a City Map:
Suppose you have a layer representing different land use zones in a city. You can create separate label classes for residential, commercial, and industrial areas. Residential areas might have smaller, subtle labels, while commercial areas could have larger, bold labels to emphasize their significance.
2. Highlighting Parks and Water Bodies in a Natural Map:
In a natural features map, label classes can differentiate between parks, lakes, and rivers. Each type of feature can have its own color and font style, ensuring that water bodies are distinct from parks, making the map more informative and visually appealing.
3. Displaying Elevation Information for Different Contour Levels:
For a topographic map, you can set up label classes for major and minor contour lines. Major contour labels might appear at a larger scale with more prominent styling, while minor contours can have a smaller, less intrusive appearance.
Benefits of Using Label Classes
- Improved Map Readability: By differentiating labels based on feature types, label classes make it easier for map users to interpret the information presented.
- Customizability: ArcGIS Pro allows you to fully customize label classes to match the theme and requirements of your map, giving you control over font, color, placement, and visibility.
- Dynamic Labeling: Using label classes in combination with conditional expressions, you can create dynamic labels that respond to changes in attribute values, scale, and other map variables.
Tips for Effective Labeling with Label Classes
- Keep It Simple: Avoid creating too many label classes for a single layer, as it can become difficult to manage and may lead to cluttered labels.
- Test at Different Scales: Make sure your label classes work well across different zoom levels. Adjust visibility ranges so that labels only appear when they are legible and relevant.
- Use Arcade for Dynamic Expressions: Take advantage of the Arcade expression language to build more sophisticated labeling rules that respond dynamically to changes in the dataset.
Conclusion
Label classes in ArcGIS Pro are an essential tool for creating informative and aesthetically pleasing maps. By setting up different classes based on feature attributes and customizing their appearance, you can communicate complex information more clearly. Whether you are working with transportation networks, land use maps, or topographic data, label classes offer the flexibility needed to enhance your mapping projects.
Experiment with label classes in your next ArcGIS Pro project to see how they can transform your maps into more powerful visual communication tools!
