Take your ArcGIS Pro skills to the next level with our introductory Mastering ArcGIS Pro 3: Maps, Layers, Projects and Layouts class and intermediate level Mastering ArcGIS Pro 3: Editing, Analysis, and Automation class.
In the fast-paced world of GIS, time is of the essence. Custom project templates in ArcGIS Pro offer an efficient way to kickstart your projects with the tools, maps, and configurations you need, ready and waiting. Whether you’re setting up multiple projects that follow similar workflows or looking to ensure consistency across a team, custom project templates save time and reduce repetitive setup tasks. In this article, we’ll walk you through the benefits and steps for creating your own project templates in ArcGIS Pro.
Why Use Project Templates?
A project template in ArcGIS Pro is a powerful way to standardize your project environment. When you create a project template, you essentially save a configured starting point for future projects. This template can include maps, custom layouts, specific toolboxes, symbology, and even geodatabase or folder connections—all tailored to your workflow. Here are some key advantages of using project templates:
1. Consistency Across Projects: Ensure that each project begins with the same structure, files, and settings, which is especially helpful for team projects where uniformity is essential.
2. Efficiency: Save time by reducing repetitive setup steps. All of your standard layers, layouts, and tools are ready from the start.
3. Customized Setup: Tailor the template to specific tasks, such as data collection, analysis, or map production. Each template can be designed to suit a unique workflow.
Creating Your Own Custom Project Template
Creating a project template in ArcGIS Pro is a straightforward process. Follow these steps to create a reusable template tailored to your needs:
Step 1: Set Up the Project Environment
Begin by setting up a new project that includes all the resources, tools, and configurations you want to include in your template. This might involve:
- Adding and organizing layers in maps
- Setting symbology and labeling for each layer
- Creating and arranging layouts with title blocks, legends, and north arrows
- Adding specific toolboxes or geoprocessing tools
- Establishing folder and database connections
The goal here is to design the project environment so that it’s ready to go for any future project that uses this template.
Step 2: Save the Project as a Template
Once your project environment is configured, you’re ready to save it as a template:
- Go to the Share tab and select Project Template
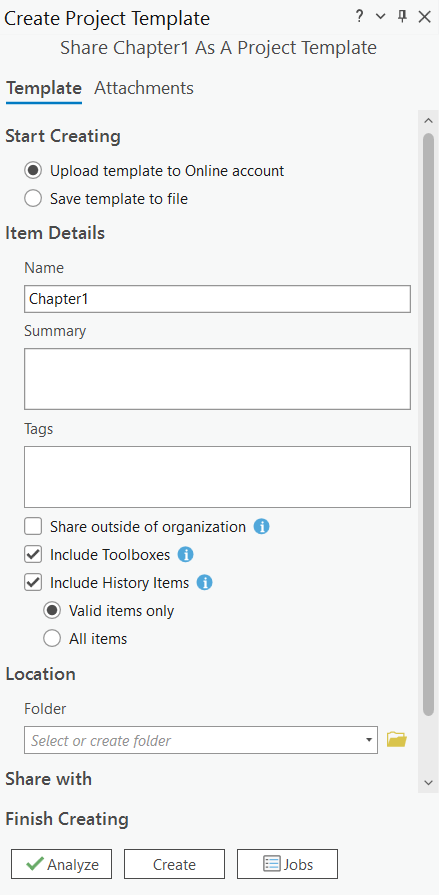
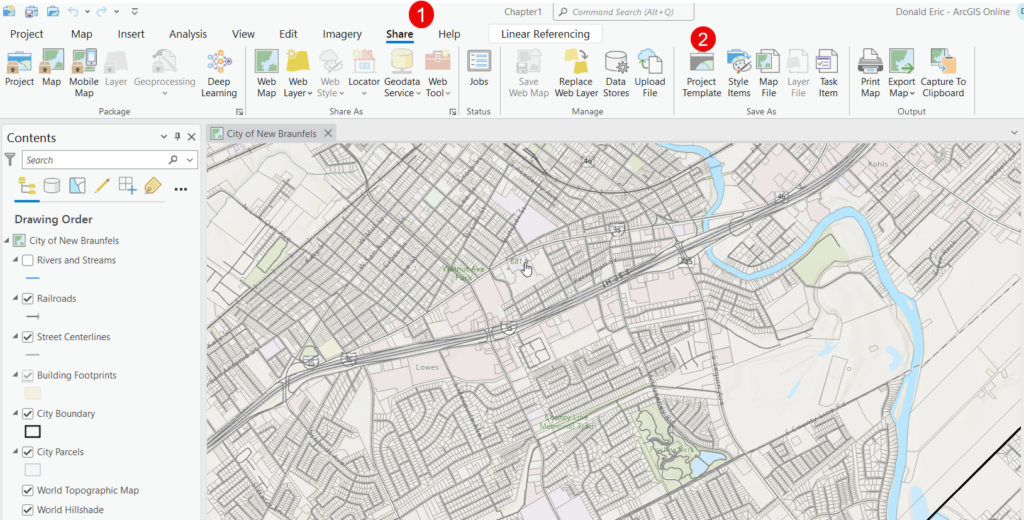 This will display the Create Project Template pane seen below. The default is to create and “Upload the template to an Online account” (AGOL or Enterprise). However, you can elect to “Save the template to a local file“. Saving to an online accounts makes it easier to share with others if that is your intent.
If you accept the default of saving to an online account you’ll need to define a name for the project template, a summary, tags, whether to include toolboxes and history items, location, and sharing information.
If you elect to save the template to a local file the interface will change as seen below. The parameters are fewer for a local save, but you will need to define an name for the project template along with a location where the template will be stored. By default, locally stored project templates will be placed in the C:\Users\<username>\
Documents\ArcGIS\ ProjectTemplates folder. 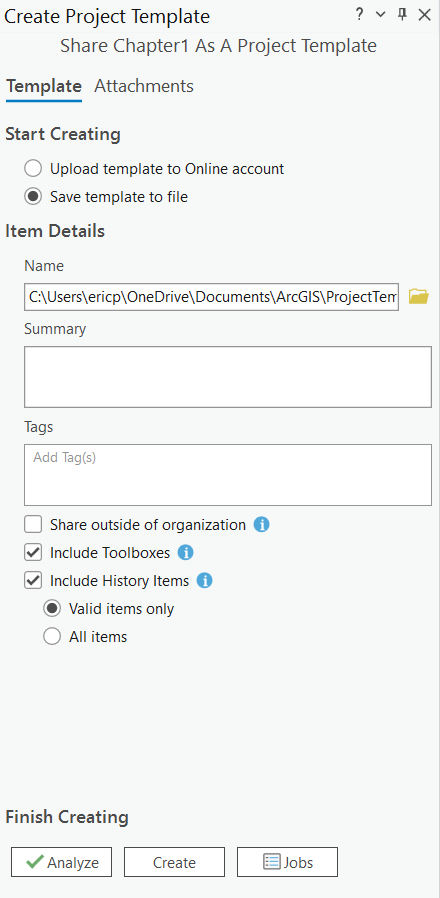
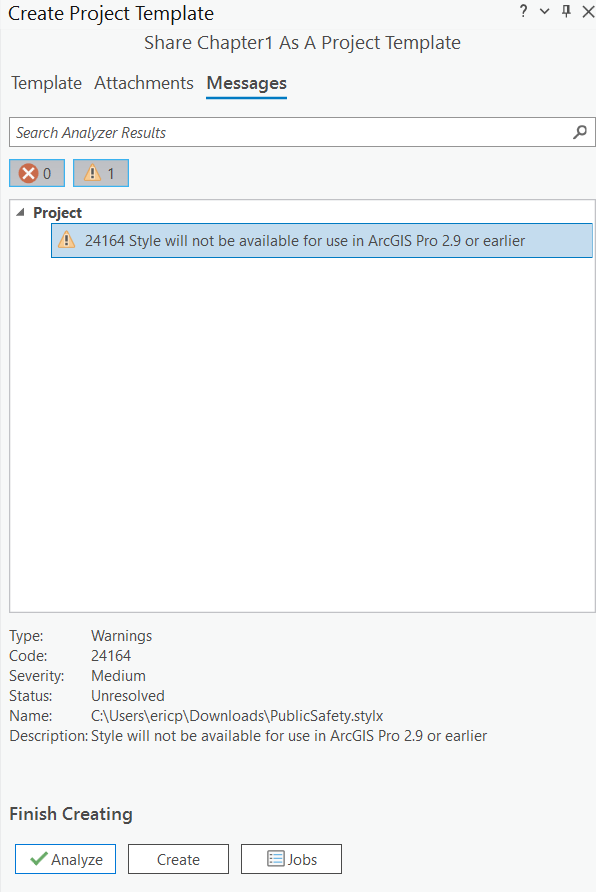
In either case the project will need to be analyzed for potential warnings or errors before the template can be created. To initiate this process click the Analyze button.
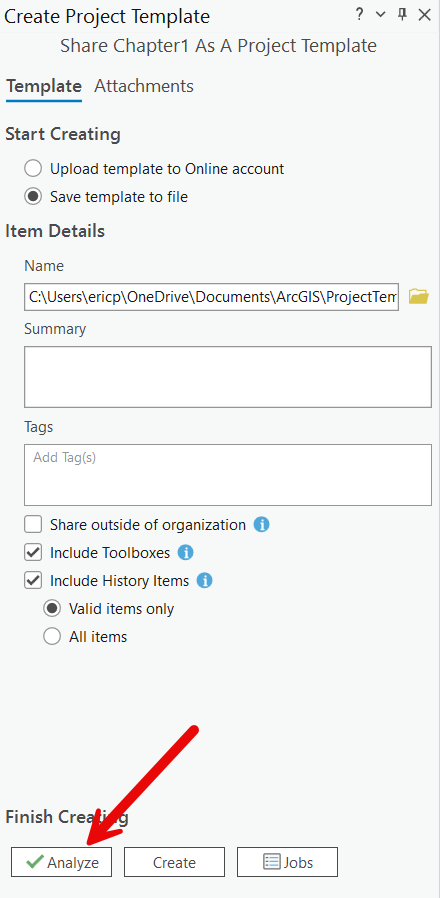
If there aren’t any warnings or errors you should see the following:
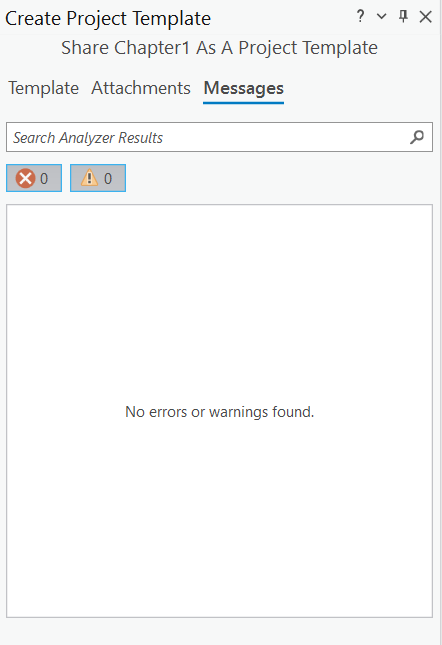
On the other hand if there are some potential issues with your project you’ll see warning or errors message as seen below. Warnings will not stop a project from being created, but any errors will need to fixed before the template can be created.
Potential Warnings and Errors
When analyzing a project in ArcGIS Pro for creation as a project template, you may encounter several common warnings and errors. Here are some of the most frequent issues to be aware of:
- Relative Path Warnings:
– Warning: ArcGIS Pro may warn you if the project contains absolute paths to data sources. For templates, it’s recommended to use relative paths to avoid broken links when the project is shared or moved.
– Solution: Convert paths to relative paths to ensure data sources remain accessible in new locations. - Broken Data Links:
– Error: If any layers or resources in your project are linked to data sources that are unavailable or have been moved, you’ll see broken link errors.
– Solution: Reconnect to the original data sources or ensure all data is accessible from a central location or included in the project package. - External Database Connections:
– Warning: Connections to databases or external sources that are not part of the ArcGIS project may not transfer correctly.
– Solution: Make sure that any required databases are accessible to users of the template, or embed essential data directly in the project. - Licensing and Permissions:
– Warning: If your project uses licensed data, tools, or extensions, you may see warnings related to these requirements.
– Solution: Ensure that anyone using the template has access to the necessary licenses, or remove restricted content from the template. - Unsupported Custom Tools or Scripts:
– Warning/Error: Custom Python scripts, toolboxes, or ModelBuilder models that rely on external files or specific environments may generate warnings or errors.
– Solution: Test all custom tools in a clean environment to ensure they function without dependencies, or document any special requirements. - Missing Styles or Fonts:
– Warning: If the project uses custom styles, fonts, or symbols that are not included with ArcGIS Pro, users may see warnings about missing resources.
– Solution: Include custom styles or ensure that they are accessible to users who will be using the template. - Unsupported Data Types:
– Error: Some advanced data types or formats may not be supported in ArcGIS Pro templates.
– Solution: Ensure that all data types in the project are supported and will work in the template. - Outdated or Deprecated Tools:
– Warning: If the project includes tools or functions that are deprecated in ArcGIS Pro, you may receive warnings.
– Solution: Update tools and replace deprecated functions with supported ones to avoid compatibility issues.
Being aware of these common issues can help you prepare a more robust project template, making it easier for others to use without encountering issues. Be sure to thoroughly test your template in a different environment to catch any potential problems.
2. After resolving any warnings or errors, click the Create button to finish the process. The project template will have a file extension of .aptx as seen below.

Your project is now saved as a template that you can access and reuse.
Step 3: Using the Template for New Projects
To start a new project based on your template:
1. Open ArcGIS Pro and go to New Project.
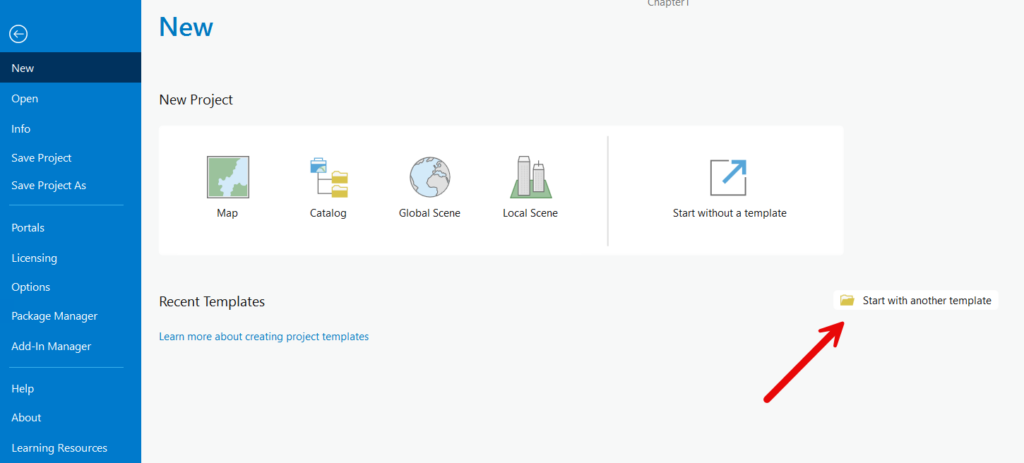
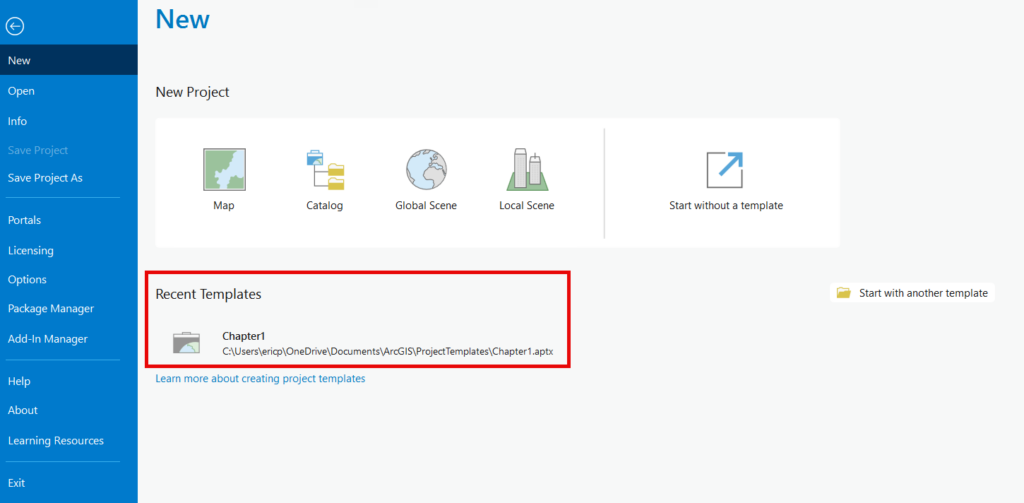
2. Select the “Start with another template” button and find your saved template as seen below.
3. Click on the template to create a new project with all the pre-configured elements from your saved setup.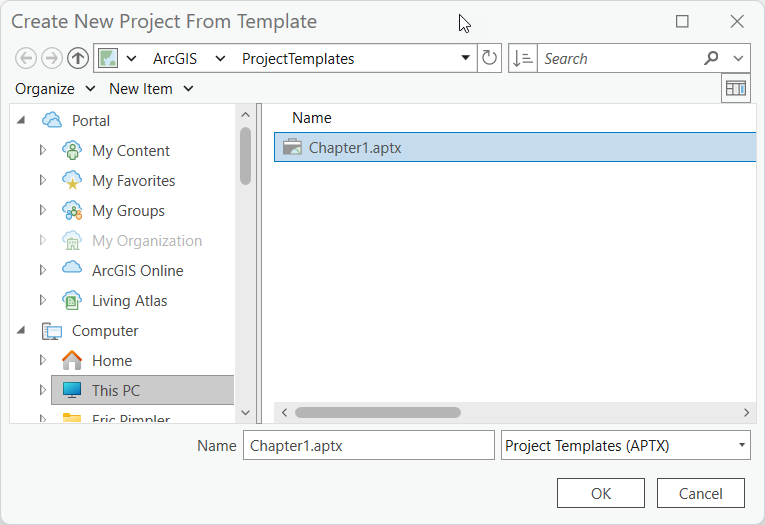
4. Name your project and define a location.
5. This will load the template content into the new project.
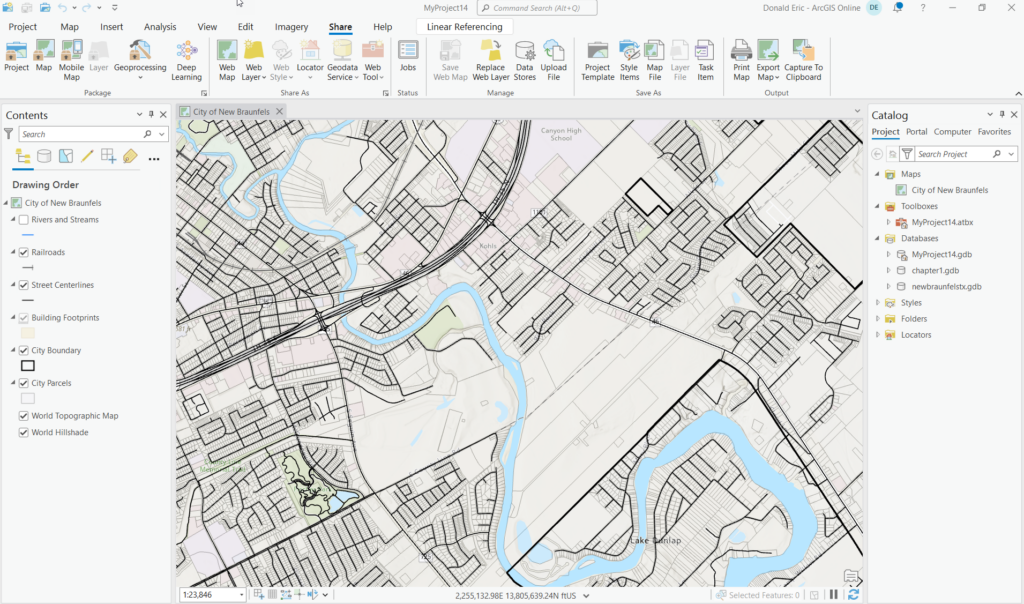
Each time you start a new project from this template, you’ll have a ready-to-use environment tailored to your workflow.
6. After loading a custom template for the first time the template will be available directly through the interface when creating a new project under the Recent Templates section seen below.
Best Practices for Custom Project Templates
Creating a project template can be transformative, but there are a few tips to maximize its usefulness:
- Organize Layers: Arrange layers and set symbology carefully. Consider the order and appearance of layers so that they are intuitive for users.
- Use Relative Paths: If your project involves shared data, use relative paths to ensure the template can be easily accessed from different machines without breaking links to data sources.
- Document the Template: Include a readme or metadata to explain the purpose of the template and any special configurations.
- Update as Needed: Keep your templates up-to-date with any new tools, data, or configurations that become relevant to your workflow.
Examples of Custom Project Templates
Here are a few scenarios where custom templates can make a difference:
- Field Data Collection Projects: Create a template with base maps, relevant toolboxes, and a layout optimized for field data visualization and reporting.
- Environmental Analysis: Set up a template with specific data layers (e.g., vegetation, hydrology) and symbology ready for analysis, including custom layouts for report generation.
- Urban Planning: Design a template with zoning, parcel, and transportation layers, along with pre-defined layouts for printing maps for planning meetings.
Conclusion
Creating custom project templates in ArcGIS Pro is a smart way to enhance your efficiency and ensure consistency across projects. By establishing a well-designed starting point tailored to your specific needs, you reduce setup time and improve productivity. Whether you’re an individual GIS professional or part of a larger team, these templates can streamline your workflow and help maintain uniformity in project design.
Now that you know the basics, give custom project templates a try. Set up a template for your next project and experience firsthand how it can simplify your GIS work. Happy mapping!

